
Here we can see, “chkdsk – Guide for Windows XP, Vista, 7, 8, 8.1, 10”
CHKDSK is a Windows application that can verify your hard disk’s integrity and rectify different file system issues.
The command CHKDSK (or chkdsk.exe) stands for “check disc.”
When your computer displays numerous boot issues, it is recommended that you utilise this application. If you need to correct any of the following issues, run the check disc utility:
- 0x00000024
- Various blue screen of death errors
- NTDETECT failed
- Fatal error reading boot.ini
- NTOSKRNL.EXE is missing or corrupt
- 0x0000007B
- 0xc0000001 on a Windows Vista computer
- 0xc000014C on a Windows 8 computer
The check disc tool can fix a variety of issues, including:
- bad sectors
- lost clusters
- cross-linked files
- directory errors
Screenshots
Depending on the Windows version you installed on your PC, you can run the check disc utility from Command Prompt or via My Computer > Properties > Tools if you can boot into Windows.
On a Windows XP PC, run the command line utility from the Windows XP Recovery Console:
In the Windows XP Recovery Console, type chkdsk.
Not Command Prompt, but the utility from within Windows XP, from My Computer:
If you can boot into Windows Vista, this is how you initiate a disc utility scan:
In Windows, how do I execute CHKDSK?
This programme is compatible with Windows XP, Vista, Windows 7, and Windows 8 or 8.1.
You can run the check disc utility on each hard drive or partition available in My Computer if you can boot into Windows.
If you can’t boot the operating system, you can use Command Prompt to launch the utility. To do so, either boot your machine into Recovery Mode or use the original installation DVD.
Windows XP’s CHKDSK
If you can boot into Windows XP, you can use either the Command Prompt or My Computer to execute the software.
Using the Command Prompt
Follow these instructions to start the utility from the Command Prompt:
- Start up your PC.
- Return to the beginning
- Click the “Run” button.
- In the box, type cmd.
- cmd command in Windows XP Run
- Press the Enter key.
- You can now open the utility in read-only mode by typing chkdsk.
- Press the Enter key.
- To correct errors, follow these steps:
- Type chkdsk volume: /f and press Enter to correct problems without scanning for bad sectors, where volume is the letter of the drive you want to scan, such as C: or D:.
If your volume is C, here’s an example of a command you’ll need to type: chkdsk /f C:
chkdsk C: /f
-
- Type chkdsk volume: /r and press Enter to repair errors and scan for bad sectors, where volume is the letter of the drive you want to repair, such as C: or D:
D:\ chkdsk is an example of a command you’ll need to type if you want to scan a volume. /r D:
- Type chkdsk volume: /r and press Enter to repair errors and scan for bad sectors, where volume is the letter of the drive you want to repair, such as C: or D:
chkdsk D: /r
From My Computer
Follow these steps to execute CHKDSK from within Windows XP without using Command Prompt:
- Start up your PC.
- On My Computer, go to (double-click on the icon)
- To run the programme, right-click on the hard disc you want to use.
- Go to the Properties tab.
- Select Tools from the drop-down menu.
- Select Check Now from the Error-checking tab.
- Simply click Start to start the software in read-only mode.
- To correct errors, follow these steps:
- Select the Automatically fix file system faults box and click Start to repair errors without checking for damaged sectors.
- Select the Scan for and try recovery of faulty sectors box and click Start to correct errors and scan for bad sectors.
9. When the utility is finished, it will tell you whether the scan found any errors (Errors were found and corrected.) or not (No errors were found.)
Using the installation CD
Download Easy Recovery Essentials – our recovery CD for Windows XP – and launch Automated Repair or Command Prompt directly if you don’t have the installation disc to execute chkdsk. EasyRE can be burned to CDs, DVDs, or USB drives.
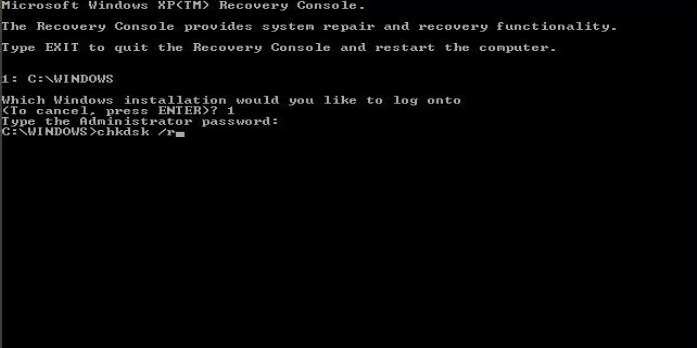
If you can’t boot into Windows XP to execute the application, open Recovery Console with your original Microsoft Windows XP installation CD.
To do so, take the following steps:
- In the disc tray, place the installation CD.
- To boot from the CD, restart your computer.
- To ensure that you boot from the CD, press any key when the “Press any key” prompt appears.
- To open Recovery Console, press R on the Windows Options menu.
- Put your Administrator password in.
- Type the following command into Command Prompt when it displays on your screen:
chkdsk C: /r
/r will attempt to repair errors and scan for bad sectors on the drive where Windows is installed, where C: is the letter of the drive.
Windows Vista’s CHKDSK
You can use one of the following techniques to execute this utility on a Windows Vista computer:
- From Command Prompt, if you can boot into Windows Vista
- From My Computer
- From the Recovery Console of your original installation
Using the Command Prompt
Run Command Prompt: if you can boot into your operating system.
- Start up Windows Vista.
- Go to Start > All Programs > Accessories > Command Prompt, or type Command Prompt into the search box and double-click the item in the search results list that says Command Prompt.
- Type the following command into Command Prompt when it appears:
chkdsk C: /r
Replace C: with the letter of your hard disc if Windows Vista is installed on a drive that isn’t labelled as C:
chkdsk D: /r
5. Press the Enter key.
If Command Prompt displays problems, try running the command again until no errors are displayed.
From My Computer
You can also use Computer (My Computer): Start to run the utility.
- To begin, press the Start button.
- Right-click on the drive you want to check in Computer.
- Go to the Properties tab.
- Click Check Now under the Error-checking section of the Tools menu.
- Enter the Administrator password if asked.
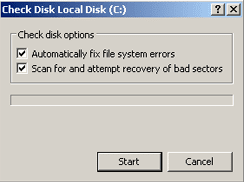
- The disc check tool is now available for use:
- Select Automatically fix file system issues to automatically remedy faults.
- Select Scan for and try recovery of faulty sectors to do a thorough check.
- You can also check both Scan for and try recovery of faulty sectors and Automatically correct file system issues.
7. Start by pressing the Start button.
Wait until the disc check is completed before using the computer. Depending on the size of the hard disc, this could take several minutes.
Using the installation CD
If you can’t get into Windows Vista, launch Command Prompt (the Recovery Console) using the original installation DVD and enter the following commands:
- Restart your computer after inserting the installation disc.
- When the message “boot from disc” appears, press any key.
- Select Repair your computer from the menu.
- Choose Command Prompt.
- If prompted, enter the Administrator password.
- When the Command Prompt window displays, type the following command:
chkdsk c: /r
where C: is the letter of your hard disc drive (can be different from C: used here).
7. Press Enter
Windows 7 CHKDSK
Running this programme in Windows 7 is equivalent to running it on Windows Vista.
Using the Command Prompt
If you can boot into Windows 7, use Command Prompt to launch the utility:
- Click Start and type cmd in the search box for programmes and files.
- Right-click cmd.exe and select Properties.
- Click the Run as Administrator button.
- Enter your Administrator password here.
- Type the following command into cmd.exe once it has loaded:
chkdsk
6. Press the Enter key.
7. You can use more arguments to run the tool, such as this:
chkdsk c: /r
This will scan the drive for faults and attempt to correct any that are discovered.
8. If the notice “Chkdsk cannot run because the volume is in use by another process.” appears, press Y to restart the computer and allow the software to do a scan on your next boot.
9. Close the Command Prompt after typing Y.
10. Go to Start > Shutdown > Restart to restart the machine.
11. The check disc utility will automatically execute a scan on the next boot.
From My Computer
To check for issues on your hard disc, run the check disc tool from My Computer.
To do so, follow the steps below:
- Make a right-click on the Start button.
- Click Open the Windows Explorer programme.
- Click Computer on the left side of the window.
- Right-click on the volume you want to examine for faults in the Hard Disk Drives section.
- Go to the Properties tab.
- Navigate to the Tools tab.
- Click Check now in the Error-checking area.
- You can now use the check disc programme to see what’s wrong with your hard drive: To have the software attempt to repair any hard drive faults discovered, select Scan for and attempt recovery of faulty sectors.
- Click Start
If the volume you want to inspect is already in use, such as C:, where Windows Vista is installed, you may get an error message like this:
Windows can't check the disk while it's in use

 Do you want to check for hard disk errors the next time you start your computer?

 Schedule disk check | Cancel
If that’s the case, take the following steps:
- Select Schedule disc check from the drop-down menu.
- Close any programmes that are running.
- Start your computer again.
- Your computer will now restart and boot up automatically, and the utility will do a scan for you.
Follow the procedures below if you receive the notice “Do you wish to dismount this volume first?” If the volume you want to inspect is locked, even if it’s not in use (for example, the C:/ disc), you’ll see this message:
Windows can't check the disk while it's in use

 Do you want to dismount this volume first? Note: All opened handles to this volume will become invalid.

 Force a dismount | Cancel
If that’s the case, take the following steps:
- Force a dismount by pressing the Force a dismount button.
- Now a scan will begin automatically.
Using the Installation CD
Take the following steps:
- Place the original Windows DVD in the drive.
- Start your computer and boot from the CD.
- Select Repair your computer from the menu.
- Select an operating system from the drop-down menu.
- Click Next, select Command Prompt.
- When it appears, type the following command:
chkdsk C: /f /r
7. Press Enter
CHKDSK in Windows 8 or 8.1
Users of Windows 8 or 8.1 can use one of the following methods to execute this utility:
Using the Command Prompt
Here are the steps to execute it from Command Prompt:
- Open Windows 8/8.1 and log in.
- To open the Charm bar, press Windows and C at the same time.
- Choose Search Type-in cmd from the drop-down menu.
- From the list of search results, right-click Command Prompt.
- Click Run the programme as an administrator.
- As an Administrator, log in.
- Type the following command into Command Prompt when it appears:
chkdsk C: /f /r /x
The following are the arguments for this command: The /f option will attempt to correct any faults that are discovered. The /r option searches for faulty sectors and recovers any readable data. Before the tool begins a scan, the /x option will require the volume you’re going to inspect to be unmounted. If your PC’s C: drive is in use, type Y to run a scan when it restarts. If this is the case, close Command Prompt and restart your computer.
From My Computer
Follow these instructions to run the check disc tool from Computer (My Computer):
- Start up Windows 8/8.1.
- To open Computer (My Computer), double-click it.
- Choose the drive you want to inspect, such as C:\
- Right-click on the drive and select Properties.
- Go to the Properties tab.
- Navigate to the Tools tab.
- In the Error checking section, select Check.
- To begin the scan, click Scan drive if you receive the following message:
You don't need to scan this drive We haven't found any errors on this drive. You can still scan the drive for errors if you want. Scan Drive
9. During the scan, you can continue to use the drive. If errors are discovered, you can choose whether or not to correct them. The utility will report the following results based on the scan results:
-
- If no mistakes were identified, the following message will appear:
Your drive was successfully scanned Windows successfully scanned the drive. No errors were found.
-
- Instead, if errors were discovered, you’ll see the following message:
Restart your computer to repair file system. You can restart right away or schedule the error fixing on next restart.
Using the Installation CD
If you can’t boot into Windows 8/8.1 to run Command Prompt, you can run Command Prompt from the original Windows 8/8.1 installation CD.
To do so, follow the steps below:
- Place the installation disc in the drive.
- Start your computer again.
- At the “Press any key to boot from CD or DVD…” message, press any key to boot from the disc.
- Select your preferred keyboard layout.
- Choose a language, a time zone, and a keyboard method.
- Next, click Next. Your computer should be repaired.
- Click Troubleshoot on the Choose an option screen.
- Click Advanced options on the Troubleshoot screen.
- Select Command Prompt from the Advanced settings menu.
- Type the following command into Command Prompt when it appears:
chkdsk C: /f /x /r
11. Press the Enter key.
Windows 10’s CHKDSK
Users of Windows 10 can utilise one of the following methods to run this utility:
Using the Command Prompt
Here are the steps to execute it from Command Prompt:
- Start your Windows 10 computer.
- To access the Start Menu, use the Windows key.
- Choose Search Type-in cmd from the drop-down menu.
- From the list of search results, right-click Command Prompt cmd.
- Click Run the programme as an administrator.
- As an Administrator, log in.
- Type the following command into Command Prompt when it appears:
chkdsk C: /f /r /x
The following are the arguments for this command: The /f option will attempt to correct any faults that are discovered. The /r option searches for faulty sectors and recovers any readable data. Before the tool begins a scan, the /x option will require the volume you’re going to inspect to be unmounted. If your PC’s C: drive is in use, type Y to run a scan when it restarts. If this is the case, close Command Prompt and restart your computer.
From My Computer
Follow these instructions to run the check disc tool from Computer (My Computer):
- Start up Windows 10
- To open Computer (My Computer), double-click it.
- Choose the drive you want to inspect, such as C:\
- Right-click on the drive and select Properties.
- Go to the Properties tab.
- Navigate to the Tools tab.
- In the Error checking section, select Check.
- To begin the scan, click Scan drive if you receive the following message:
You don't need to scan this drive We haven't found any errors on this drive. You can still scan the drive for errors if you want. Scan Drive
9. During the scan, you can continue to use the drive. If errors are discovered, you can choose whether or not to correct them. The utility will report the following results based on the scan results:
-
- If no mistakes were identified, the following message will appear:
Your drive was successfully scanned Windows successfully scanned the drive. No errors were found.
-
- Instead, if errors were discovered, you’ll see the following message:
Restart your computer to repair file system. You can restart right away or schedule the error fixing on next restart.
Using the Installation CD
If you can’t boot into Windows 10 to launch Command Prompt, you can run Command Prompt from the original Windows 10 installation DVD.
To do so, follow the steps below:
- Place the installation disc in the drive.
- Start your computer again.
- At the “Press any key to boot from CD or DVD…” message, press any key to boot from the disc.
- Select your preferred keyboard layout.
- Choose a language, a time zone, and a keyboard method.
- Next, click Next. Your computer should be repaired.
- Click Troubleshoot win10 restore on the Choose an option screen.
Parameters and commands
You can use numerous arguments with the check disc utility:
/c – only applies to NTFS volumes
/f – this option corrects volume mistakes.
/i – only applies to NTFS volumes. This option does an index entry check.
/r – the /f and /p options are also implied by this option. This option locates your hard drive’s faulty sectors and restores any readable data.
The following settings alter depending on whether you execute the utility from Command Prompt or Recovery Console:
/p – this corrects any volume mistakes. /p is only read-only in your standard Command Prompt.
The volume you’re about to check must not be locked, which is a prerequisite of this tool. You’ll get the following notification if a volume you’re about to scan is locked:
Chkdsk cannot run because the volume is in use by another process. Would you like to schedule this volume to be checked
 the next time the system restarts? (Y/N)
If so, write Y and press Enter to run a scan the next time your computer boots.
Download the chkdsk utility.
Because chkdsk is a Windows command, it cannot be downloaded. The utility tool can be executed using the original installation disc.
To run particular chkdsk commands, download Easy Recovery Essentials and start Command Prompt:
- Easy Recovery Essentials is a free download.
- The ISO image should be burned.
- Enter the recovery media.
- Select the Launch Command Line option.
Troubleshooting
In read-only mode, you can’t go any further.
If you get the message “Errors discovered.” “CHKDSK is unable to proceed in read-only mode.” Make sure you execute the check disc command with the /r argument after you’ve completed it:
chkdsk /f
If you need to run the disc check software on another volume, change the command to include the letter of the drive you want to scan:
chkdsk D: /f
The volume is being used by another process, thus it can’t be used.
If you get the following error when using the tool:
Chkdsk cannot run because the volume is in the use by another process. Would you like to schedule this volume to be checked the next time the system restarts.
To ensure that the utility executes on the next boot, type Y. If this is the case, press Y, restart the computer, and let the utility run the scan.
Current drive cannot be locked.
If the “Cannot lock current drive.” error message appears in the check disc utility, make sure the command you’re running has the /r option:
chkdsk /r
If it doesn’t work, try disabling System Restore for the entire session you’re trying to conduct a scan, as well as any other security software you might have installed, such as antivirus, firewall, and spyware.
Another command to consider is:
chkdsk C: /f /r /x
stop chkdsk on every boot
You can try a few remedies if the utility runs a scan at every boot without pausing.
Before proceeding with the instructions below, make sure the scan is completely finished and then restart your computer.
Continue with the procedures below if the check disc runs again, even if the previous scan was 100 percent complete.
Fix 1: Check to see whether a scheduled scan is available. To do so, take the following steps:
- Start a Command Prompt
- Type chkntfs c:, where c: is the drive letter you checked.
- Press the Enter key.
- A check scan on the c: drive is scheduled if the message is as follows:
The type of file system is NTFS. Chkdsk has been scheduled manually to run on next reboot on volume C:.
5. If no scheduled scans are available, the notification will read:
The type of the file system is NTFS. C: is not dirty.
6. To cancel a scheduled scan, type:
chkntfs /x c:
Fix 2: Another way to solve this problem is to use the Registry Editor:
- Start up Windows.
- Activate the Registry Editor.
- Go to the following key:
HKEY_LOCAL_MACHINE\SYSTEM\CurrentControlSet\Control\Session Manager
4. Check the value of the BootExecute key. If the value is autocheck autochk * /., you must modify it to autocheck autochk * otherwise chkdsk will not complete.
chkdsk won’t finish
If the tool fails to complete a scan, make sure you run it using the /r parameter, as shown below:
chkdsk /r
chkdsk will not run when the computer starts up
Follow any of the following fixes if the check disc won’t execute a scan at startup after being scheduled to do so.
Fix 1: In the Registry Editor, look for the BootExecute key:
- Activate the Registry Editor
- This key can be found here:
HKEY_LOCAL_MACHINE\SYSTEM\CurrentControlSet\Control\Session Manager key
3. Examine the BootExecute key’s value. If the value is autocheck autochk * /., replace it with autocheck autochk *.
Fix 2: Run sfc
You can also use the sfc /scannow command followed by chkdsk /r:
- Start a Command Prompt
- Type the command:
sfc /scannow
3. Press the Enter key.
4. Run the check disc utility when the sfc process is finished.
Conclusion
I hope you found this information helpful. Please fill out the form below if you have any queries or comments.
User Questions:
1. How do I use chkdsk to check for and rectify errors?
- Then select My Computer from the Start menu.
- To scan, right-click the hard disc drive and select Properties.
- Click the Tools tab in the Local Disk Properties window.
- Click the Check Now button.
- Select the box next to Automatically correct file system issues in the Check Disk Local Disk window.
- Start by pressing the Start button.
2. Is it better to use chkdsk F or R?
If you run chkdsk /f* on a huge disc or a disc with a large number of files (for example, millions), chkdsk /f may take a long time to finish. Use the /r argument to look for physical disc defects in the file system and try to recover data from any disc sectors that have been impacted.
3. How can I perform a chkdsk on Windows XP?
- Using the Windows Desktop to run CHKDSK
- Then select Run from the Start Menu.
- Click OK after typing cmd.
- A prompt with the letters C: will appear. Fill in the blanks: volume:/r, chkdsk, chkdsk, chkdsk, chkdsk,
- Now CHKDSK will run. The scan could take many hours.
- When the scan is finished, a report will appear on the screen.
4. How to run the chkdsk command correctly: r/Windows10
5. What’s the difference between chkdsk /r and chkdsk /f?


