
Here we can see, “Fix the MBR – Guide for Windows XP, Vista, 7, 8, 8.1, 10”
This post will show you how to repair the Master Boot Record (MBR) in any version of Windows, including XP, Vista, 7, 8, 8.1, and 10.
What exactly is the MBR?
The MBR (Master boot record) is a boot sector (a section of your hard drive) that stores information about your hard drive’s partitions and serves as a loader for the operating system you’re using.
When you first install Windows, the Master boot record is created on the first partition you create. It’s your hard disk’s first 512 bytes.
You won’t be able to boot into Windows if the MBR is broken. MBR is used by all Windows versions, including Windows XP, Vista, 7, and 8, and if it is broken, you will be unable to boot.
It can be harmed by viruses that target the MBR and attempt to replace it with their own code, or by dual booting with a Linux distribution.
Backup
Because the MBR is kept on the hard disc, you can back it up and restore it later if necessary.
To backup the MBR, you only need to run one command:
dd if=/dev/sda of=/path-to-save/mbr-backup bs=512 count=1
The path where you want to save mbr-backup in the above command is /path-to-save/mbr-backup.
Restore
This command can be used to restore the saved Master boot record:
dd if=/path-to-get/mbr-backup of=/dev/sda bs=512 count=1
The path where you have the mbr-backup stored is /path-to-get/mbr-backup in this command.
Common errors
Your computer may display some of the following errors if the Master boot record is corrupted:
- Error loading operating system

- Operating System not found

- Invalid partition table

- No bootable medium found

- Reboot and select proper boot device

Other errors produced by a corrupted boot record may appear, depending on a variety of variables.
Easy Recovery Essentials will repair the MBR
With its Automated Repair function for Windows XP, Vista, 7, or 8, Easy Recovery Essentials, our bootable recovery and restore CD/USB, is guaranteed to repair most issues done to the Master boot record (MBR):
- Easy Recovery Essentials is a free download. Before downloading, select your Windows version (XP, Vista, 7, or 8) from the drop-down menu.
- The image should be burned. Because creating a bootable CD can be challenging, carefully follow these instructions on how to burn the bootable ISO image.
- Boot Essentials for a Quick Recovery
- Select Automated Repair from the drop-down menu and click Next.
- Select the letter of your Windows installation drive (typically C:) and select Automated Repair.
- The Easy Recovery Essentials programme will now start.
- When the procedure is finished, click Restart.
- Windows XP, Vista, Windows 7, and Windows 8 should now load properly.
In Windows XP, repair the MBR.
The fixmbr command in Windows XP can be used to repair the MBR. To run Recovery Console and the fixmbr tool, you’ll need the original Windows XP installation CD.
Only Windows XP and Windows 2000 support the fixmbr command.
To run fixmbr, follow these steps:
- Start by booting from the Windows XP CD.
- Press any key to boot from the CD when the notice “Press any key to boot from CD…” appears.
- Press R to launch Recovery Console when the Welcome to Setup page opens.
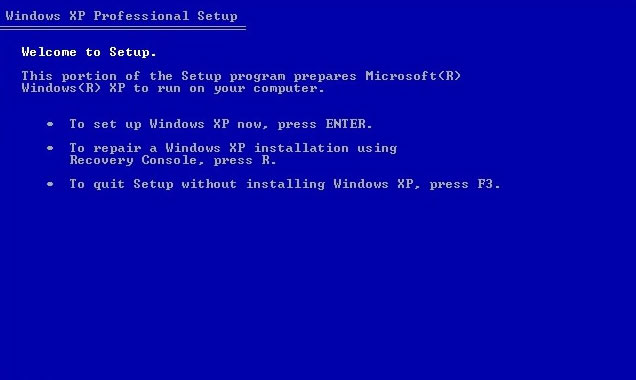
- If Windows XP is the only operating system on your hard disc, type 1 and hit Enter in the “Which Windows installation would you like to log onto” prompt.
- Enter the administrator password in the “Type the Administrator password” question and then press Enter.
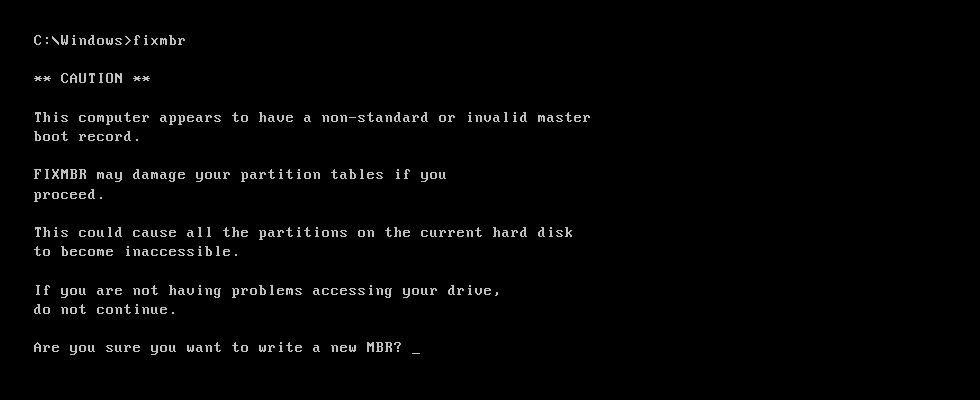
- Type
fixmbr
If you get the message “Are you sure you want to write a new MBR?” push Y and then Enter.
4. Press the Enter key.
5. Wait for the procedure to complete. The fixmbr utility software will fix any damage to your hard drive.
the master boot disc
6. Remove the Windows XP CD
7. Type exit from the programme.
8. To restart your computer, press Enter.
If you were unable to boot your computer due to a damaged MBR, follow the steps above to repair it, and Windows XP should now start normally.
If the fixmbr command fails, use the map command to find the correct drive name where the Master boot record has to be repaired:
- Type map
- Press the Enter key.
- Wait for the map utility’s output:
C: NTFS 1024MB \Device\Harddisk0\Partition1 E: \Device\CdRom0
The output shown above is an example. Your computer’s output may differ, but make a note of the drive letter for the item with Harddisk0, which in this example is C:\
In Windows Vista, repair the MBR.
The bootrec command in Windows Vista is used to fix the MBR in a different way than it is in Windows XP.
To use the bootrec software, you’ll need your original Windows Vista installation CD/DVD.
The instructions are as follows:
- Start your computer by booting from the Windows Vista installation CD or DVD.
- Select your preferred language and keyboard layout.
- Select Repair your computer from the Welcome screen.
- Select an operating system and then click Next.
- Select Command Prompt from the System Recovery Options box that displays.
- Type the following commands into the Command Prompt when it appears:
bootrec /FixMbr bootrec /FixBoot bootrec /RebuildBcd
For a complete description of the foregoing commands, type bootrec.exe.
7. After each command, press Enter.
8. Wait for the operation to be completed. A confirmation message will show on the screen if it was successful.
9. Take the CD/DVD out of the drive.
10. Enter the word “exit.”
11. Restart your computer by pressing Enter.
Before executing bootrec.exe, you can run Startup Repair for Windows Vista to see if it can automatically fix the boot fault. The following are the steps to execute Startup Repair:
- Start the computer by booting from the installation CD/DVD.
- After you’ve chosen your language and keyboard layout, click Repair your computer.
- Select your operating system from the drop-down menu and click Next.
- Select Startup Repair from the System Recovery Options dialogue box that displays.
- Wait for the procedure to complete. When the system prompts you, restart your computer.
6. If the bootrec /rebuildbcd command fails, another option is to entirely rebuild the BCD. Type the following commands while you’re at the Command Prompt:
bcdedit /export C:\bcdbackup c: cd boot attrib bcd -s -h -r ren c:\boot\bcd bcd.backup bootrec /rebuildbcd
7. Hit Enter after each command.
In Windows 7, repair the MBR.
To get into System Recovery Options and execute Command Prompt, you’ll need your original Windows 7 installation DVD.
The instructions are as follows:
- Start the computer by booting from the Windows 7 installation DVD.
- Press any key to boot from CD or DVD…” at the “Press any key to boot from CD or DVD…” screen.
- Choose a language.
- Choose a layout for your keyboard.
- Next should be selected.
- Click Next after selecting the operating system. When choosing an operating system, make sure to tick the box that says “Use recovery tools to help fix problems starting Windows.”
- Select Command Prompt from the System Recovery Options menu.
- When Command Prompt has loaded successfully, type the following command:
bootrec /rebuildbcd
9. Press the Enter key.
10. Type the following command:
bootrec /fixmbr
11. Press the Enter key.
12. Type the following command:
bootrec /fixboot
13. Press the Enter key.
14. Restart your computer after removing the installation DVD from the disc tray.
If bootrec /fixmbr and bootrec /fixboot don’t work, try recovering your Windows 7 boot sector code:
- Type the following lines in the Command Prompt to determine the drive letter of your Windows installation CD/DVD:
diskpart select disk 0 list volume
2. In a “Type” column, look for the word “CD-ROM.” This is the drive letter for your CD/DVD installation. Type the following commands if the drive letter is D:\
exit D: cd boot dir
Replace the second command with the drive letter you noticed from the previous list volume command if the drive letter is not D:\.
3. Type the following command:
bootsect /nt60 SYS /mbr
4. Press the Enter key.
5. Take the CD/DVD out of the drive.
6. Enter the word “exit.”
7. To restart your computer, press Enter.
In Windows 8 or 8.1, repair the MBR.
To fix the Master boot record, you’ll need the original Windows 8 or 8.1 installation DVD.
If you don’t have the Windows 8/8.1 installation CD/DVD, go to Fix MBR with Easy Recovery Essentials to run Command Prompt.
The instructions are as follows:
- Start by booting from the installation DVD (or the recovery USB)
- Click Repair your computer on the Welcome screen.
- Select Troubleshoot.
- Select Command Prompt.
- Type the following instructions into the Command Prompt after it has loaded:
bootrec /FixMbr bootrec /FixBoot bootrec /ScanOs bootrec /RebuildBcd
6. After each command, press Enter and wait for the operation to complete.
7. Take the DVD out of the disc tray.
8. Enter the word “exit.”
9. Press the Enter key.
10. Check if Windows 8/8.1 can now boot by restarting your PC.
If the bootrec utility fails to fix your Windows 8/8.1, try the following commands to repair the EFI bootloader:
- Boot from the installation DVD or the recovery USB for Windows 8 or Windows 8.1.
- Select Repair your computer from the menu.
- Select Troubleshoot.
- Select Command Prompt.
- Type the following commands in succession, pressing Enter after each one:
diskpart sel disk 0 list vol
These commands will choose your computer’s first disc and provide a list of all partitions accessible on that disc.
6. Look for the volume item with the Fs column FAT32 in the Fs column. FAT32 must be used to format the EFI partition. Type the following command if the EFI partition’s volume number is “2”:
sel vol 2
Replace “2” with the number accessible on your machine if the volume number is not 2.
7. Assign a unique letter to this partition, such as x:\, that is not one of the ones existing on your machine. To allocate the letter, type this command:
assign letter=x:
8. Wait for the message “success” to appear:
DiskPart successfully assigned the drive letter or mount point.
9. To exit the DiskPart utility, type exit:
exit
10. Replace x:\ with the letter you assigned to the EFI partition previously in this command:
cd /d x:\EFI\Microsoft\Boot\
11. Then type the bootrec command to rebuild the volume:
bootrec /fixboot
12. Now you need to backup the old BCD and recreate a new one. Type:
ren BCD BCD.backup
13. Type this command to recreate the BCD and replace the x:\ with the assigned letter earlier:
bcdboot c:\Windows /l en-us /s x: /f ALL
14. Windows is installed on c:\ in the command above. Replace c:\ with your drive letter if your Windows 8/8.1 installation is on a different drive letter.
15. Take the DVD out of the disc tray.
16. Enter the word “exit.”
17. Start your computer again.
In Windows 10, repair the MBR.
To repair the Master boot record, you’ll need the original Windows 10 installation DVD.
If you don’t have the Windows 10 installation DVD, proceed to Fix MBR with Easy Recovery Essentials to run Command Prompt.
The instructions are as follows:
- Start by booting from the installation DVD (or the recovery USB)
- Click Repair your computer on the Welcome screen.
- Select Troubleshoot.
- Select Command Prompt.
- Type the following instructions into the Command Prompt after it has loaded:
bootrec /FixMbr bootrec /FixBoot bootrec /ScanOs bootrec /RebuildBcd
6. After each command, press Enter and wait for the operation to complete.
7. Take the DVD out of the disc tray.
8. Enter the word “exit.”
9. Press the Enter key.
10. Check if Windows 10 can now boot by restarting your PC.
If the bootrec utility fails to fix your Windows 10 installation, try the commands below to repair the EFI bootloader:
- Start Windows 10 by booting from the installation DVD or a Windows 10 setup or recovery USB drive.
- Select Repair your computer from the menu.
- Select Troubleshoot.
- Select Command Prompt.
- Type the following commands in succession, pressing Enter after each one:
diskpart sel disk 0 list vol
These commands will choose your computer’s first disc and provide a list of all partitions accessible on that disc.
6. Look for the volume item with the Fs column FAT32 in the Fs column. FAT32 must be used to format the EFI partition. Type the following command if the EFI partition’s volume number is “2”:
sel vol 2
Replace “2” with the number accessible on your machine if the volume number is not 2.
7. Assign a unique letter to this partition, such as x:, that is not one of the ones existing on your machine. To allocate the letter, type this command:
assign letter=x:
8. Wait for the message “success” to appear:
DiskPart successfully assigned the drive letter or mount point.
9. To exit the DiskPart utility, type exit:
exit
10. Replace x:\ with the letter you assigned to the EFI partition previously in this command:
cd /d x:\EFI\Microsoft\Boot\
11. Then type the bootrec command to rebuild the volume:
bootrec /fixboot
12. Now you need to backup the old BCD and recreate a new one. Type:
ren BCD BCD.backup
13. To rebuild the BCD, use this command, replacing the x: with the letter you were assigned earlier:
bcdboot c:\Windows /l en-us /s x: /f ALL
14. Windows is installed on c:\ in the command above. Replace c:\ with your drive letter if the drive letter where Windows 10 is installed is different.
15. Take the DVD out of the disc tray.
16. Enter the word “exit.”
17. Start your computer again.
Conclusion
I hope you found this information helpful. Please fill out the form below if you have any queries or comments.
User Questions:
1. What is the purpose of fix MBR?
Fixmbr is a Recovery Console command that creates a new master boot record on the specified hard disc drive. In Windows 2000 and Windows XP, you can only use this command from the Recovery Console.
2. What is the best way to repair the MBR on my SSD?
- AOMEI Partition Assistant Standard can be downloaded, installed, and run. Select the SSD and right-click it to choose “Rebuild MBR,” or go to Disk > Rebuild MBR from the main menu.
- In the pop-up window, select the MBR type.
- To commit the Rebuild MBR process, click “Apply” on the toolbar.
3. Can MBR be fixed by formatting?
The MBR and boot sector of the partition onto which Windows is installed are ALWAYS overwritten by “Windows Install,” which normally includes a format.
4. Is there a quick solution to fix MBR?
5. MBR appears to be messed up, and I’m not sure how to fix it – Reddit
MBR appears ruined, can’t figure out how to fix it from techsupport


