
Here we can see, “Startup Repair Infinite Loop: Fix for Windows Vista, 7, 8, 8.1”
For the following Windows versions: Windows Vista, Windows 7, Windows 8, or Windows 8.1, get the repair for the interminable Startup Repair loop error.
This problem prohibits you from accessing anything on your computer and forces you to launch Startup Repair indefinitely.
Symptom 1: The computer repeatedly attempts to enter Startup Repair mode.
Before Windows begins to load, a notice appears every time the PC is rebooted, stating that “Windows failed to start” and offering the option to “Launch Startup Repair (recommended)” from a variation of the Advanced Boot Options menu, as shown below:
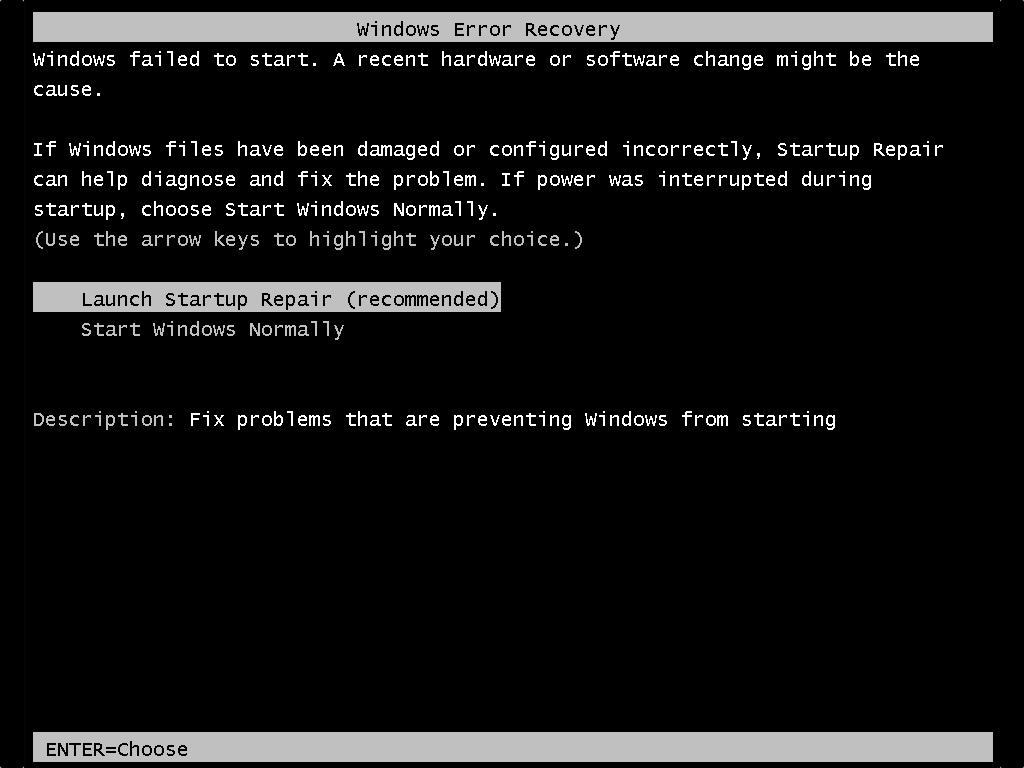
Windows Error Recovery

Windows failed to start. A recent hardware or software change might be the
cause.

If Windows files have been damaged or configured incorrectly, Startup Repair
can help diagnose and fix the problem. If power was interrupted during
startup, choose Start Windows Normally.
(Use the arrow keys to highlight your choice.)

    Launch Startup Repair (recommended)
    Start Windows Normally

Description: Fix problems that are preventing Windows from starting
Startup Fix will then either fail to load, launch but not repair, or run and claim that repairs have been completed – but your PC will continue to try to start Startup Repair every time you boot.
This is known as Automatic Repair in Windows 8 and Windows 8.1.

Automatic Repair

Automatic Repair couldn't repair your PC

Press "Advanced options" to try other options to repair your PC or "Shut down" to turn off your PC.
Log file: C:\Windows\System32\Logfiles\Srt\SrtTrail.txt

Shut down | Advanced options
The path to the log file can be different.
The reasons for this error
One or more of the following factors have been linked to this error:
Reason 1: Damaged or corrupted BCD settings
Boot sector viruses and other malware that target the bootloader or the booting chain can cause faults in the bootloader settings and state, resulting in a never-ending Startup Repair loop.
The virus may then prevent Startup Repair from running or completing its fixes. A botched Windows Update or Automatic Update can also cause the Boot Configuration Data (BCD) to become incompatible or non-functional.
Reason 2: Corrupted boot partition
Windows 7 and later generate a separate 100 MiB NTFS partition at the beginning of the drive allocated for core bootloader files and BCD configuration by default.
During writes to the boot partition, an unsafe shutdown, sudden power loss, hard disc failure, or a blue screen of death might leave your system in an inconsistent state, unable to boot and cycling endlessly into the Startup Repair.
Reason 3: When you reboot, you get a Blue Screen of Death
A BSOD may occur every time Windows tries to boot.
Recent versions of Windows are set up to hide this information from the user and reboot silently.
(In the opinion of the NeoSmart Technologies researchers, there is practically never a solid reason to do this.) Microsoft believes that rebooting your computer will repair it, so it hides the blue screen and reboots incessantly and in vain.
A far more logical approach would be for Windows to keep track of whether or not this blue screen previously resulted in a silent and automated reboot, and if so, to display it so the user can understand what’s going on.)
If a BSOD occurs during boot up, a version of the Advanced Boot Options menu will appear on the next reboot, urging the user to select “Repair Your Computer,” resulting in the Startup Repair loop.
Use Easy Recovery Essentials for a guaranteed fix
Easy Recovery Essentials’ built-in Automated Repair tool is guaranteed to automatically fix the “endless repair computer loop” fault. EasyRE can be downloaded and produced on any PC and is presently available for Windows XP, Vista, 7, and 8.
- Easy Recovery Essentials is a free download. Before you download EasyRE, note your Windows version (XP, Vista, 7, or 8).
- The image should be burned.
- Start your computer with the Easy Recovery Essentials CD or USB you made.
- After EasyRE has started, select “Automated Repair” and click Continue.
- After EasyRE has finished scanning your computer’s discs, find and pick the drive letter for your Windows installation from the list, and then click the Automated Repair option to start the repair process.
- Easy Recovery Essentials will begin looking for faults on the selected drive. EasyRE will scan the disc, partition, bootsector, filesystem, bootloader, and registry for faults and rectify them automatically. EasyRE’s repair is automated; thus, no interaction is required.
- EasyRE will provide its findings after the process is completed. To reboot your PC and test the changes, click the Restart option.
- As your PC starts to boot, the “endless repair computer loop” issue should be fixed.
Fixes for the Startup Repair Infinite Loop in Windows Vista and Windows 7
Fix 1: Run chkdsk on the boot volume
The chkdsk command-line tool comes with Windows and can be used to check (and sometimes fix) filesystem corruption on your devices. You may learn more about how chkdsk works and how it runs in our knowledge base. The chkdsk program will be used in the following steps, which will launch the command line option from the Startup Repair on the Windows setup disc.
- Place your Windows installation DVD in the CD-ROM drive of your computer.
- Make sure your computer is completely turned off by shutting it down completely.
- Turn on your computer.
- When you see “Press any key to boot from CD or DVD,” press any key.
- After selecting your language and keyboard selections, click the “Repair your computer” link in the bottom-lefthand corner.
- Wait for Startup Repair to finish scanning your computer for Windows installations, then choose yours from the list.
- To get started, select “Command Prompt” from the list of potential recovery options.
Launch the command prompt and type the following to use the System File Checker to verify your installation for corrupted, invalid, or deleted system files. If your Windows installation includes a drive letter other than C:\, make sure to use that drive letter below!
chkdsk C: /f
chkdsk will start scanning your drive for errors, correcting them if it can, and reporting its findings when it’s through.
Checking file system on C:
The type of the file system is NTFS.
Volume label is Windows 7.

CHKDSK is verifying files (stage 1 of 5)...
259072 file records processed.
....
Windows has finished checking your disk.
Fix 2: Turn off the auto-restart feature
The Advanced Boot Options menu at startup can disable automatic restart on system failure. This behaviour will be triggered by the methods below; more detailed information on preventing automatic restart on system failure may be found in our knowledge base.
- Restart your computer
- Allow your BIOS to finish POST (the screen that displays your manufacturer’s logo and system information).
- Start hitting F8 continuously until the list of boot options appears.
- “Disable automatic restart on system failure” is the option to select.
- Wait for your computer to boot up after pressing Enter.
Fix 3: Attempt to manually rebuild the BCD
The bootloader installation or setup errors are frequently to blame for problems booting up Windows. The BOOTMGR bootloader can be fixed by rebuilding your PC’s master boot record (MBR), partition bootsectors, and boot configuration data (BCD).
Bootrec.exe, an utility included in the Windows Recovery Environment, can reconstruct the BCD. Take the following steps:
- Place your Windows installation DVD in the CD-ROM drive of your computer.
- Please turn off your computer and double-check that it has completely shut off.
- Turn on your computer.
- When you see “Press any key to boot from CD or DVD,” press any key.
- After selecting your language and keyboard selections, click the “Repair your computer” link in the bottom-lefthand corner.
- Wait for Startup Repair to finish scanning your computer for Windows installations, then choose yours from the list.
- To get started, select “Command Prompt” from the list of potential recovery options.
- Once the command line is up and running, type the following commands into the Command Prompt, pressing Enter after each one:
bootrec /fixmbr
bootrec /fixboot
bootrec /rebuildbcd
Fixes for Windows 8’s Automatic Repair Loop
Fix 1: Boot into Safe Mode
The Automatic Repair loop problem can sometimes be fixed by booting into Safe Mode and uninstalling newly installed device drivers or software.
- Restart the computer after inserting the DVD.
- To boot from the DVD, press any key.
- Select a keyboard layout.
- On the Install now page, select Repair your machine.
- Select Troubleshoot from the drop-down menu.
- Select Advanced option
- Click Startup Settings
- Press the Restart button.
- To enter Safe Mode, press F4.
If booting in Safe Mode doesn’t fix the problem, move on to Fix 2: Run bootrec.
Fix 2: Run bootrec
Rebuilding the BCD using the bootrec program may resolve the issue. Follow these instructions to start bootrec.exe on Windows 8 or 8.1:
- Insert the Windows 8/8.1 installation DVD or USB stick.
- Select Computer Repair from the drop-down menu.
- Select Troubleshoot and then Advanced Options from the drop-down menu.
- Click Command Prompt
- When the Command Prompt appears, type the following commands:
bootrec /fixmbr
bootrec /fixboot
bootrec /rebuildbcd
6. After each command, press Enter.
7. Type exit and restart your computer after the last command – bootrec /rebuildbcd – completes the procedure.
Fix 3: Run chkdsk
On Windows 8 and Windows 8.1 PCs, the chkdsk application may fix the Automatic Repair Loop.
To get to it, repeat the steps from Fix 2: To get to Command Prompt, run bootrec:
- Select Troubleshoot > Advanced options > Command Prompt
- When the Command Prompt appears, type the following commands:
chkdsk /r
3. Press Enter
Fix 4: System Restore
Follow the same steps as in Fix 2 to get to System Restore: To go to the Advanced Options page, run bootrec:
- Select Troubleshoot from the drop-down menu.
- Restore the system by clicking System Restore.
- To complete the process, follow the wizard’s instructions. Select a restore point before the date the Automatic Repair loop problem first appeared.
Conclusion
I hope this information was helpful. If you have anything to add, please do so in the comments.
User Questions:
1. What is the best way to get around Windows Startup Repair?
- Type bcdedit /set default recovery enabled No in Command Prompt and hit Enter.
- If you restart your computer, the Automatic Startup Repair feature should be disabled, and you should be able to access Windows 10 once more.
- If you need to re-enable it, execute bcdedit /set default recovery enabled Yes and hit Enter in CMD.
2. How can I get out of a never-ending boot loop on Windows 7?
- Restart the computer after inserting the DVD.
- To boot from the DVD, press any key.
- Select a keyboard layout.
- On the Install now page, select Repair your machine.
- Select Troubleshoot from the drop-down menu.
- Select Advanced settings from the menu.
- Select Startup Settings from the menu.
- Press the Restart button.
3. What is the cause of the startup repair loop?
Malware that targets the bootloader or the booting chain might cause faults in the bootloader settings and state, resulting in an endless loop of Startup Repair. The virus may prevent Startup Repair from running or completing its fixes.
4. What should I do if my computer’s starting repair is stuck?
Place your Windows installation CD in the drive. When you see “Press any key to boot from CD or DVD,” press any key. Click Next after selecting your Windows installation drive. After selecting your language, time, and typing technique, select Repair your machine.
5. What is the solution to the infinite prepared automatic repair loop?
- Restart the computer completely.
- Enter Safe Mode.
- Disable the Automatic Repair feature.
- Refresh or reset your computer.
- Install Windows 10 from scratch or reinstall it.


