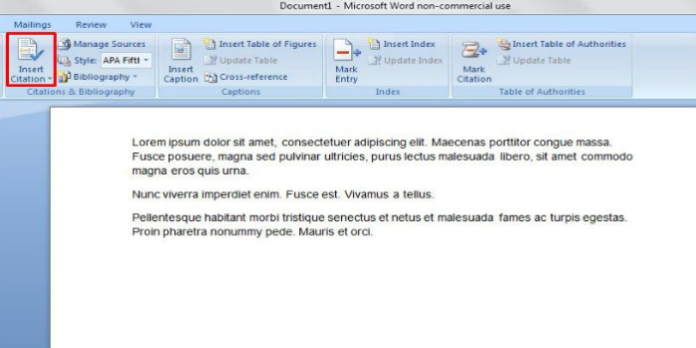
Here we can see, “How to Automatically Add Citations And Bibliographies To Microsoft Word”
Students have always struggled with properly formatting bibliographies. Modern versions of Microsoft Word, on the other hand, have made the process almost automatic, and we’ll show you how to add citations and bibliographies to your Word documents today.
Note that the techniques we’ll go over here should be compatible with Microsoft Word 2007 and later. The screenshots were all taken in the most recent version of Word 2016, so yours may differ slightly, but it will function similarly.
Creating Sources and Adding Citations To Your Text
- Place your cursor where you want the citation to appear in any Word document you’re working on. Then, on the Ribbon, go to the “References” tab and the “Insert Citation” button.
- The popup menu that appears shows any sources you’ve already added (more on that later), but you can also add a new source by clicking the “Add New Source” command.
- You can enter all of the relevant information for any source in the Create Source window that appears. The “Type of Source” dropdown is set to Book by default, but you can change it to other types of sources such as journal articles, websites, interviews, and so on by simply opening it.
- Select the source type, fill in the fields, give your source a tag name (usually a shortened version of the title), and click “OK” to complete the source.
Note: Word uses the APA citation style by default, but it isn’t limited to that. Click the “Show All Bibliography fields” option to fill out extra information if you’re using another citation method for your document.
- Word adds a citation to your document for your new source. Click the “Insert Citation” button again the next time you need to cite that particular source. Your source (along with any other sources you’ve added) appears in the list. When you choose a source, Word automatically inserts the citation into the document.
- Word uses the APA style for citations by default, but you can change this by selecting a different option from the “Style” dropdown next to the “Insert Citation” button.
Repeat those steps to add any additional sources you require and place citations where you desire.
Creating Your Bibliography
- When you’ve finished your paper, include a bibliography that lists all of your sources. Create a new page at the end of your document by going to Layout > Breaks > Page Break.
- Toggle to the “References” tab and select the “Bibliography” option.
- You can choose from a few pre-formatted bibliography styles with headers or use the “Insert Bibliography” option to create one without a title or other formatting.
Bam! Word creates a bibliography for all of the works you cited in your document, in the correct order and format for the writing style you chose.
Back Up and Retrieve Your Sources
What if you write papers on similar topics frequently and don’t want to re-enter source information into Word each time? Here, too, Word has you covered. Every time you add a new source, it’s saved in the “master source list,” as Word refers to it. You can pull old heads from the master list and apply them to your current project for each new document.
- Click the “Manage Sources” button on the “References” tab.
- The window that appears displays all of the previous sources you’ve used. Select a start and then “Copy” to apply it to the current document on the left side of the window. Next, a rep for each source you require then clicks “OK” to complete.
- If you’ve entered dozens or hundreds of sources, you can use the search tool at the top of this window to quickly narrow the list down by author, title, year, or the tag you’ve assigned to each one.
If you need to move your source list to a different computer or a different version of Word, look for it in an XML file at the following location (where username is your user name):
C:\Users\username\AppData\Roaming\Microsoft\Bibliography
After copying the file to another computer, open Word on the new computer and look for the file using the “Manage Sources” button.
Conclusion
I hope you found this information helpful. Please fill out the form below if you have any questions or comments.
User Questions:
- What does Citations & Bibliography in MS Word mean?
In-text citations are possible with Microsoft Word’s Citations & Bibliography feature. You can generate a bibliography in any format automatically from your in-text citations.
- What is the difference between a citation and a bibliography?
APA citations, AMA citations, and MLA citations are examples of citation styles that use reference lists. On the other hand, Bibliographies list all of the sources you used for your paper, whether or not they were cited directly.
- Does the APA style make use of works cited or a bibliography?
When citing sources in MLA (Modern Language Association) style, the title Works Cited is typically used. In contrast, when citing sources in APA (American Psychological Association) style, the title References is generally used. The terms “works cited”, and “bibliography” are not interchangeable.
- The best free reference software for keeping track of references, citations, and auto-generating references in Microsoft Word – (2018)
Best free reference software to tracking references, citation tool & auto generate reference for Ms Word – (2018) from MicrosoftWord
- Microsoft Word has an auto bibliography function.
Microsoft Word has an auto bibliography function. from lifehacks


