
Here we can see, “Fix the registry – Guide for Windows XP, Vista, 7, 8, 8.1, 10.”
In Windows XP, repair a corrupt registry.
Follow these steps to repair a corrupt registry on a Windows XP system:
- Restart the machine after inserting the Windows XP setup CD.
- To boot from the CD, press any key.
- To get to the Repair Console, press R.
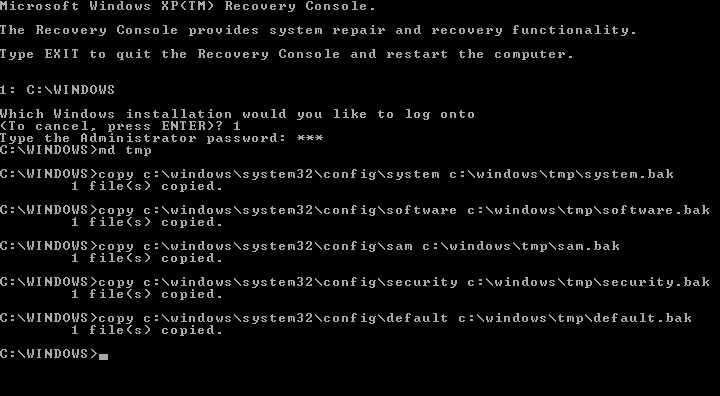
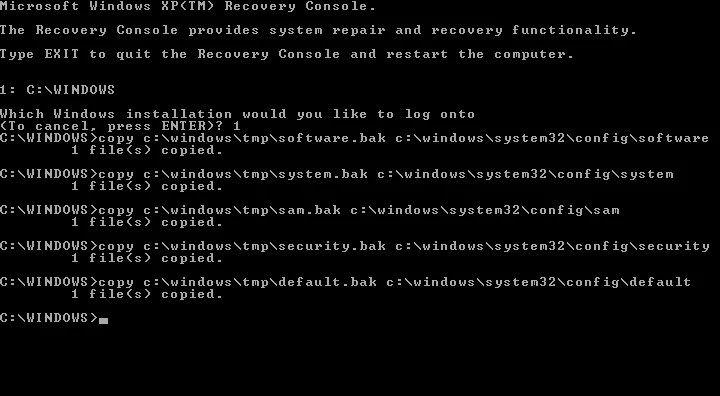
- The Administrator password must be entered. When the Command Prompt appears, type the following instructions one at a time, pressing Enter after each one, replacing C: with the drive letter assigned by Windows:
md tmp
copy c:\windows\system32\config\system c:\windows\tmp\system.bak
copy c:\windows\system32\config\software c:\windows\tmp\software.bak
copy c:\windows\system32\config\sam c:\windows\tmp\sam.bak
copy c:\windows\system32\config\security c:\windows\tmp\security.bak
copy c:\windows\system32\config\default c:\windows\tmp\default.bak
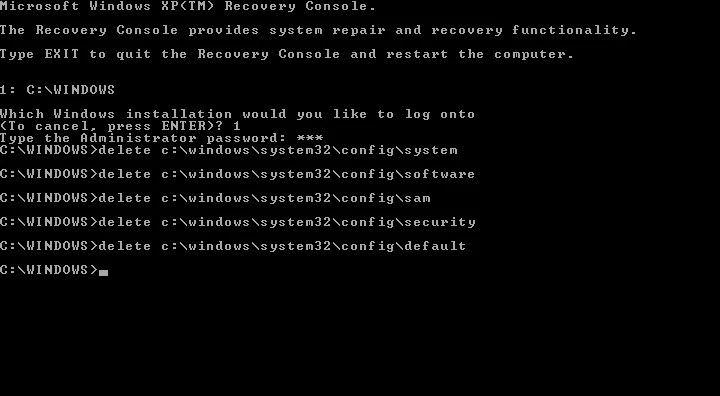
delete c:\windows\system32\config\system
delete c:\windows\system32\config\software
delete c:\windows\system32\config\sam
delete c:\windows\system32\config\security
delete c:\windows\system32\config\default
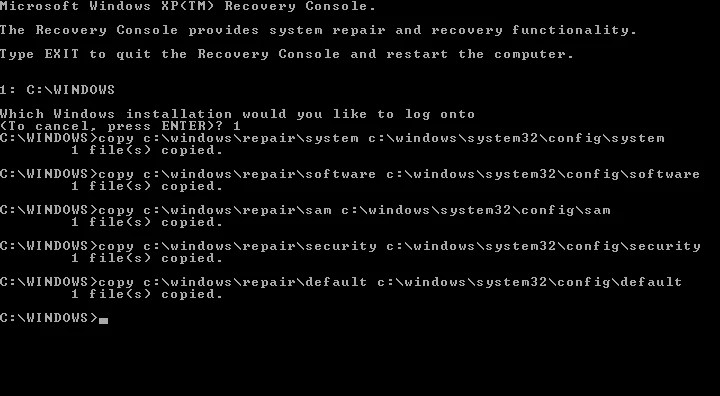
copy c:\windows\repair\system c:\windows\system32\config\system
copy c:\windows\repair\software c:\windows\system32\config\software
copy c:\windows\repair\sam c:\windows\system32\config\sam
copy c:\windows\repair\security c:\windows\system32\config\security
copy c:\windows\repair\default c:\windows\system32\config\default
5. Remove your CD and type exit:
exit
6. Press the Enter key.
7. Restart your computer.
8. After booting, continually press the F8 key until the Startup Options screen displays, then choose to boot into Safe Mode.
9. Start the Windows Explorer program (or open any folder or open My Computer)
10. Select Tools from the drop-down menu.
11. Select Folder Options from the menu bar.
12. Navigate to the View tab.
13. To clear the Hide protected operating system files (Recommended) check box, go to the Show hidden files and folders section and select Show hidden files and folders (unchecked)
14. To confirm these actions, select Yes.

15. Go to My Computer > C: drive, or the drive where Windows was installed.
16. Select the System Volume Information folder from the drop-down menu. If you are refused access to a folder, please follow these steps to regain access: http://support.microsoft.com/kb/309531. If your Windows XP installation is on NTFS rather than FAT32, you’re more likely to see an Access forbidden message. If it’s formatted in FAT32, you can proceed with the steps below.
17. Open any folder that hasn’t been created yet, such as when you first logged onto the computer for this session. This may be verified by right-clicking on the first folder and checking the date. These folders have a title format that looks like this:
_restore{87BD36673246476B923FF86E30B3E7F8}
Open any RP folder in that folder, e.g. RP1, and go to Snapshot.These are called Restore Points. Here is an example of path:
C:\System Volume Information\_restore{D86480E373EF47BCA0EBA81BE6EE3ED8}\RP1\Snapshot
19. From the Snapshot folder, copy the following files to C:\Windows\Tmp
- _REGISTRY_MACHINE_SAM
- _REGISTRY_MACHINE_SYSTEM
- _REGISTRY_MACHINE_SOFTWARE
- _REGISTRY_MACHINE_SECURITY
- _REGISTRY_USER_.DEFAULT
20. After copying the files, rename them in the Tmp folder (not the Snapshot folder) as follows:
- Rename _REGISTRY_USER_.DEFAULT to DEFAULT
- Rename _REGISTRY_MACHINE_SECURITY to SECURITY
- Rename _REGISTRY_MACHINE_SOFTWARE to SOFTWARE
- Rename _REGISTRY_MACHINE_SYSTEM to SYSTEM
- Rename _REGISTRY_MACHINE_SAM to SAM
21. Restart your computer and select the CD drive this time.
22. To get to the Recovery Console, press R.
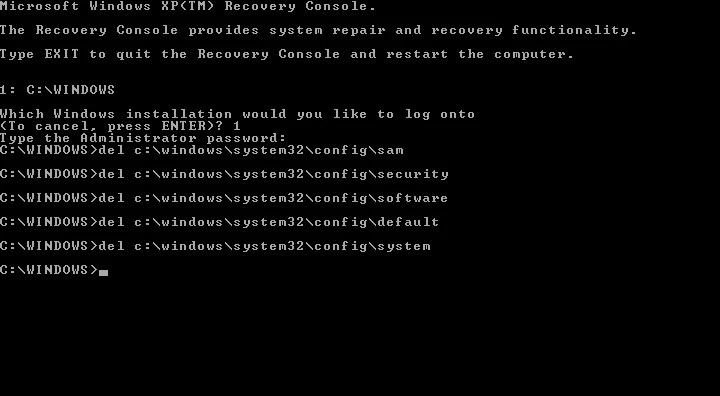
23. Once Command Prompt has loaded, type the commands below one by one, pressing Enter after each command:
del c:\windows\system32\config\sam
del c:\windows\system32\config\security
del c:\windows\system32\config\software
del c:\windows\system32\config\default
del c:\windows\system32\config\system
Keep going with the following commands:
copy c:\windows\tmp\software.bak c:\windows\system32\config\software
copy c:\windows\tmp\system.bak c:\windows\system32\config\system
copy c:\windows\tmp\sam.bak c:\windows\system32\config\sam
copy c:\windows\tmp\security.bak c:\windows\system32\config\security
copy c:\windows\tmp\default.bak c:\windows\system32\config\default
24. Remove your CD by typing exit and pressing Enter:
exit
25. Restart your computer.
26. After the computer has been restarted, go to System Restore and select Restore to a prior point:
- Click Start button.
- Go to the All Programs page.
- Select Accessories
- Then choose Tools.
- Restore the system by clicking System Restore.
28. Follow the procedures in the System Restore wizard.
In Windows Vista, repair a corrupt registry.
You can use any of the following methods to repair a corrupt registry in Windows Vista:
Repair the startup
Follow these steps to execute Startup Repair:
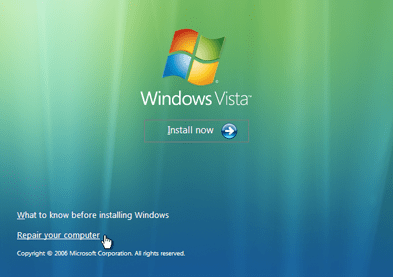
- In the disc tray, place the original Windows Vista DVD.
- Start by booting from the DVD.
- Select a keyboard layout and a language.
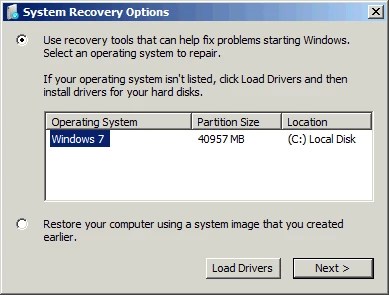
- Select Repair your computer from the Welcome screen.
5. Select your operating system from the drop-down menu.
6. Next should be selected.
7. Select Startup Repair from the System Recovery Options window.
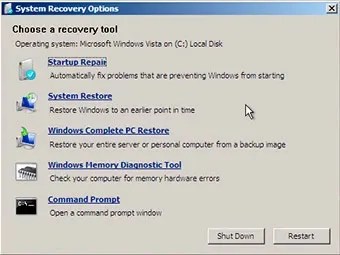
8. To finish the process, follow the steps.
Installing an Upgrade
Because an Upgrade Install would reinstall Windows Vista without damaging your files, it may be able to repair a faulty registry.
Please notice the following before continuing with the instructions below:
- If you have SP1 (Service Pack 1) installed on your Windows Vista system, your original installation DVD must also have SP1.
- If you have SP2 (Service Pack 2) installed on your Windows Vista system, your original installation DVD must also include SP2.
The instructions are as follows:
- As an administrator, log in to Windows Vista.
- In the disc tray, place the Windows DVD.
- If AutoPlay does not immediately launch the DVD, go to My Computer and double-click the DVD drive.
- Click Install Now

5. For installation, select Do not obtain the latest updates.
6. You can manually upgrade Windows Vista with the newest updates available once you complete the Upgrade Install.
7. The license key should not be typed.
8. Uncheck the box that says, “Automatically activate Windows when I’m online.”
9. Next should be selected.
10. Do you want to put your product key in right now? pick No in response to the question
11. Check the checkbox. I have picked the edition of Windows that I purchased after selecting the type of Windows Vista you purchased.
12. Next should be selected.
13. Upgrade by clicking Upgrade.
14. Remove the DVD and follow any remaining instructions.
After you’ve completed the Upgrade Install, enter the following license key:
- Startup Windows Vista.
- Activate the Control Panel
- Navigate to System
- Click the Change product key in the Windows activation area.
Use the Command Prompt
Follow these procedures to replace the registry in a Windows Vista system:
- Open Command Prompt and type C:\, where C:\ is the drive letter on which Windows Vista is installed:
C:\
2. Press the Enter key.
3. Type cd Windows\System32\Config
4. Type MD Temp and press Enter
5. Type the commands below and hit Enter after each one:
copy BCDTemplate Temp copy COMPONENTS Temp copy DEFAULT Temp copy SAM Temp copy SECURITY Temp copy SOFTWARE Temp copy SYSTEM Temp

6. Type the commands below and hit Enter after each one:
ren BCDTemplate BCDTemplate.bak ren COMPONENTS COMPONENTS.bak ren DEFAULT DEFAULT.bak ren SAM SAM.bak ren SECURITY SECURITY.bak ren SOFTWARE SOFTWARE.bak ren SYSTEM SYSTEM.bak

7. Then, one by one, type the following commands, pressing Enter after each one:
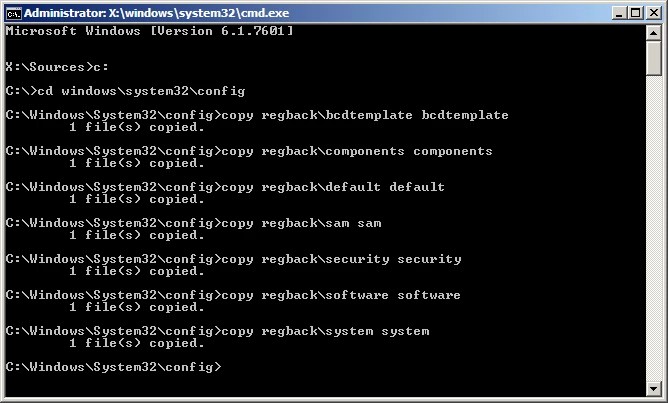
copy Regback\BCDTemplate BCDTemplate copy Regback\COMPONENTS COMPONENTS copy Regback\DEFAULT DEFAULT copy Regback\SAM SAM copy Regback\SECURITY SECURITY copy Regback\SOFTWARE SOFTWARE copy Regback\SYSTEM SYSTEM

In Windows 7, repair a corrupt registry.
You can use any of the following methods to repair a corrupt registry in Windows 7:
Repair the startup
Follow the steps below to execute Startup Repair.
Method 1
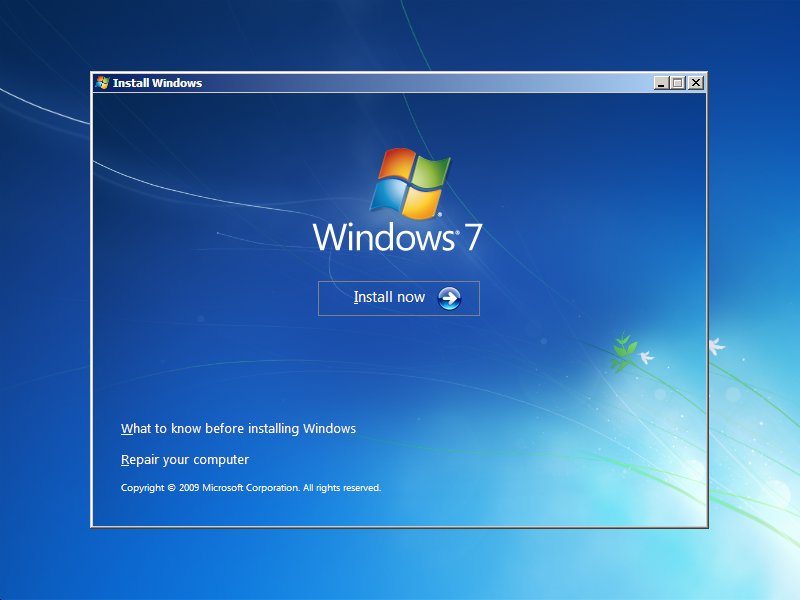
- In the disc tray, place the original Windows 7 installation DVD.
- Restart your computer.
- When it reads “Press any key to boot from CD or DVD,” press any key.
- Choose a language and a keyboard layout.
- Select Repair your computer from the menu.
6. Choose an operating system.
7. Select Startup Repair.
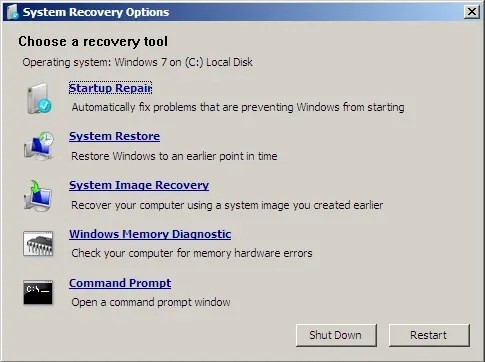
8. To finish the procedure, follow the wizard’s instructions.
Method 2
- Restart your computer
- Before the Windows 7 logo displays, press the F8 key numerous times during startup.
- Select Repair your machine from the Advanced Options menu.
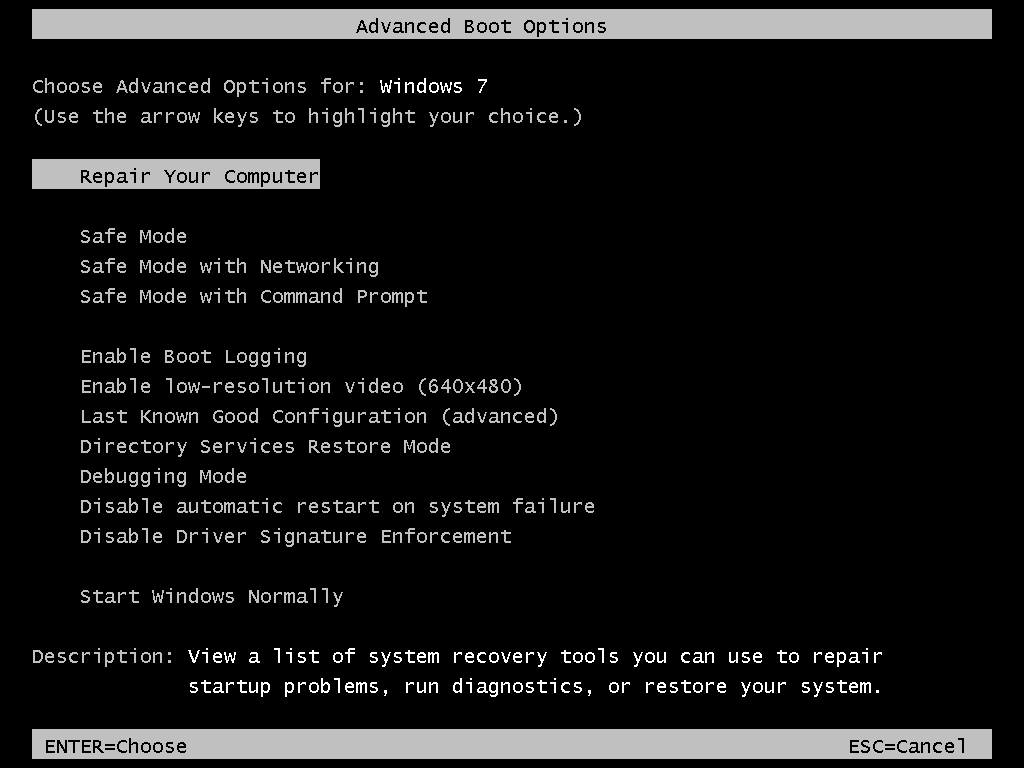
4. Choose a language and a keyboard.
5. Choose Startup Repair.

6. To finish the process, follow the wizard’s instructions.
Installing an Upgrade
An Upgrade Install may repair a faulty registry because it will reinstall Windows 7 without harming your files.
The instructions are as follows:
- Startup Windows 7
- Place the Windows 7 DVD in the drive.
- If AutoPlay doesn’t work, try opening the DVD from your computer.
- Install Now is the button to use.
- Make sure the option I wish to assist in making Windows installation better is unchecked.
- Click Install the most recent updates by going online.
- Accept the terms of the license.
- Next, select Upgrade.
- Untick the box that says, “Automatically activate Windows when I’m online.”
- Next, click Next. Later, at the Help safeguard your computer and enhance Windows automatically screen, you can ask me questions. Once this process is complete, you can install Windows 7 updates.
- Follow the on-screen directions to finish the upgrade.
After you’ve completed this process, go ahead and activate your license key:
- Navigate to the Control Panel.
- Navigate to System
- Click the Change product key in the Windows activation area.
Use the Command Prompt
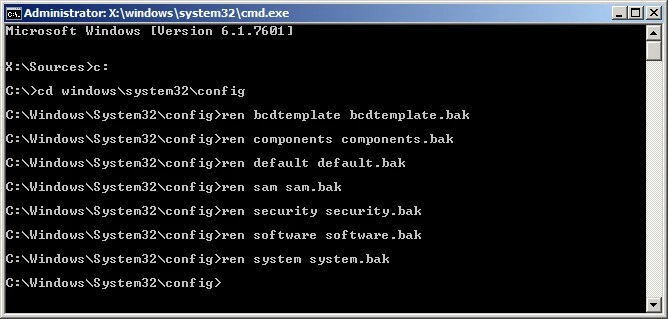
Follow these procedures to replace the registry in a Windows 7 system:
- Open Command Prompt and type C:\, where C:\ denotes the drive letter on which Windows 7 is installed.
- Enter the command cd Windows\System32\Config.
- Type
MD Tempand press Enter - Type the following commands and press Enter:
copy BCDTemplate Temp copy COMPONENTS Temp copy DEFAULT Temp copy SAM Temp copy SECURITY Temp copy SOFTWARE Temp copy SYSTEM Temp

5. Type the commands below and hit Enter after each one:
ren BCDTemplate BCDTemplate.bak ren COMPONENTS COMPONENTS.bak ren DEFAULT DEFAULT.bak ren SAM SAM.bak ren SECURITY SECURITY.bak ren SOFTWARE SOFTWARE.bak ren SYSTEM SYSTEM.bak
6. Then, one by one, type the following commands, pressing Enter after each one:
copy C:\Windows\System32\Config\Regback\BCDTemplate C:\Windows\System32\Config\BCDTemplate copy C:\Windows\System32\Config\Regback\COMPONENTS C:\Windows\System32\Config\COMPONENTS copy C:\Windows\System32\Config\Regback\DEFAULT C:\Windows\System32\Config\DEFAULT copy C:\Windows\System32\Config\Regback\SAM C:\Windows\System32\Config\SAM copy C:\Windows\System32\Config\Regback\SECURITY C:\Windows\System32\Config\SECURITY copy C:\Windows\System32\Config\Regback\SOFTWARE C:\Windows\System32\Config\SOFTWARE copy C:\Windows\System32\Config\Regback\SYSTEM C:\Windows\System32\Config\SYSTEM
In Windows 8 or 8.1, repair a corrupt registry.
In Windows 8 or 8.1, you have the following options for repairing a corrupt registry:
- Start the Automatic Repair Refresh process.
- Your files will not be affected by the Refresh option. Windows 8 will reinstall any applications you’ve installed and generate a replica of them on your desktop, but you should back up your data beforehand.
- Reset. Resetting your computer will wipe all of your files and any settings or configurations you have made.
Run Automatic Repair
Follow these steps to start Automatic Repair, which will attempt to correct a faulty registry on your Windows 8 or 8.1 system:
- Activate the Settings menu.
- Go to the General tab.
- Click Restart immediately in the Advanced Startup panel.
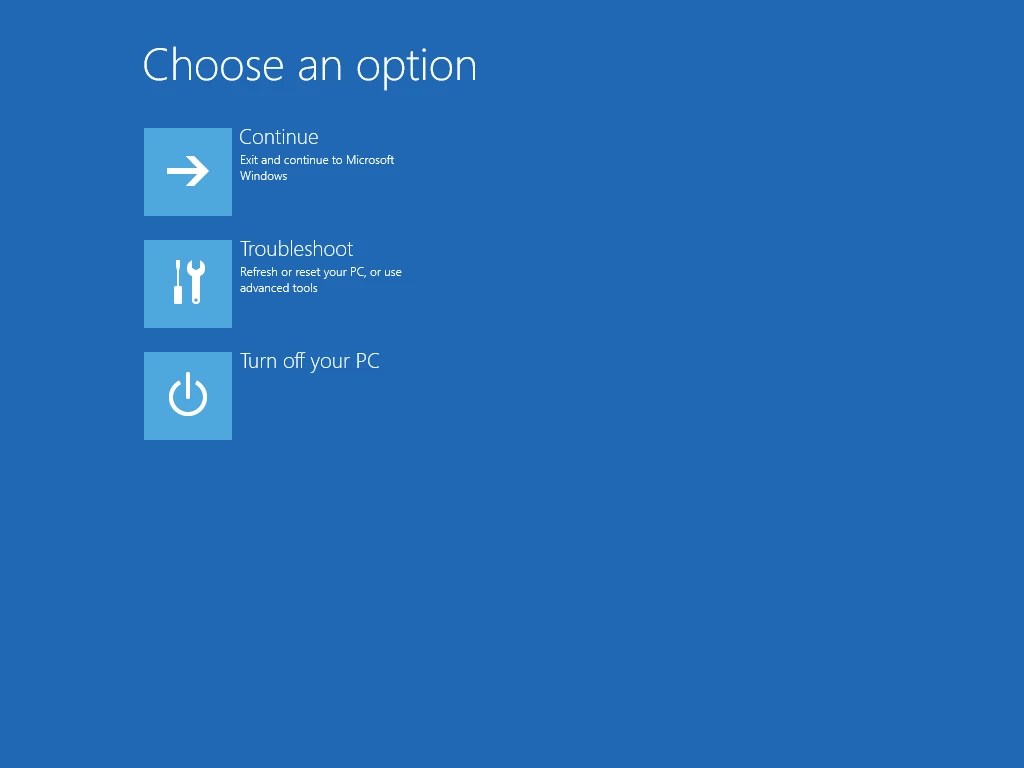
- Click Troubleshoot on the Choose an option screen.
- Click Automated Repair on the Advanced Options screen.
- When prompted, select an account and log in. Automatic Repair should now begin, and your computer may reboot during this procedure.

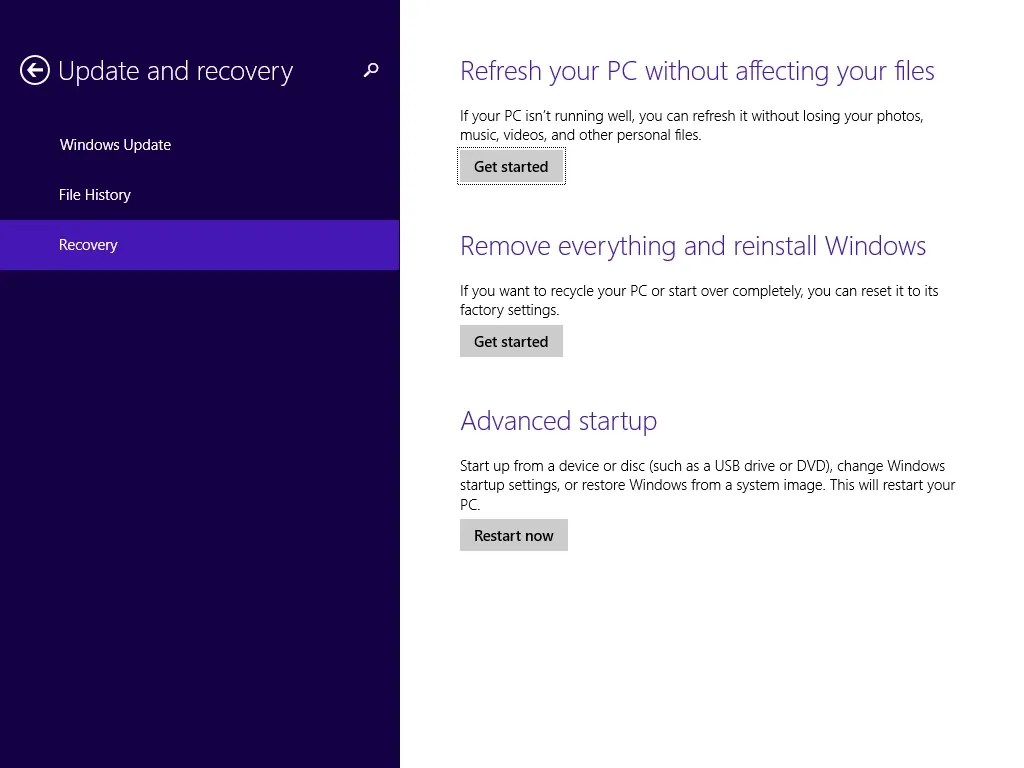
Refresh
Follow these steps to do a Refresh on your Windows 8 or Windows 8.1 system:
- Navigate to the Settings section.
- Change your PC’s settings
- Click the Update and Recover button.
- Select Recover.
- Click Refresh your PC without impacting your files in the Refresh your PC section. Begin now.
- To complete the refresh procedure, follow the instructions.

Reset
Follow these procedures to reset your Windows 8 or Windows 8.1 system:
- Change your PC’s settings by going to Settings > Change PC Settings.
- Click the Update and Recover button.
- Select Recover.
- Click Remove everything and reinstall Windows in the Remove everything and reinstall Windows section. Begin now.
- To complete the refresh procedure, follow the instructions.
In Windows 10, repair a corrupt registry.
In Windows 10, you have the following options for repairing a corrupt registry:
- Start the Automatic Repair Refresh process.
- Your files will not be affected by the Refresh option. Windows 10 will reinstall any applications you’ve installed and create a replica of them on your desktop, but you should back up your data beforehand.
- Reset. Resetting your computer will wipe all of your files and any settings or configurations you have made.
Run Automatic Repair
Follow these instructions to start Automatic Repair, which will attempt to repair a faulty registry on your Windows 10 system:
- Activate the Settings menu.
- Select Update & Security from the drop-down menu.
- At the Recovery tab, click Advanced Startup -> Restart now
- Click Troubleshoot on the Choose an option screen.
- Click Automated Repair on the Advanced Options screen.
- When prompted, select an account and log in. Automatic Repair should now begin, and your computer may reboot during this process.’
Refresh
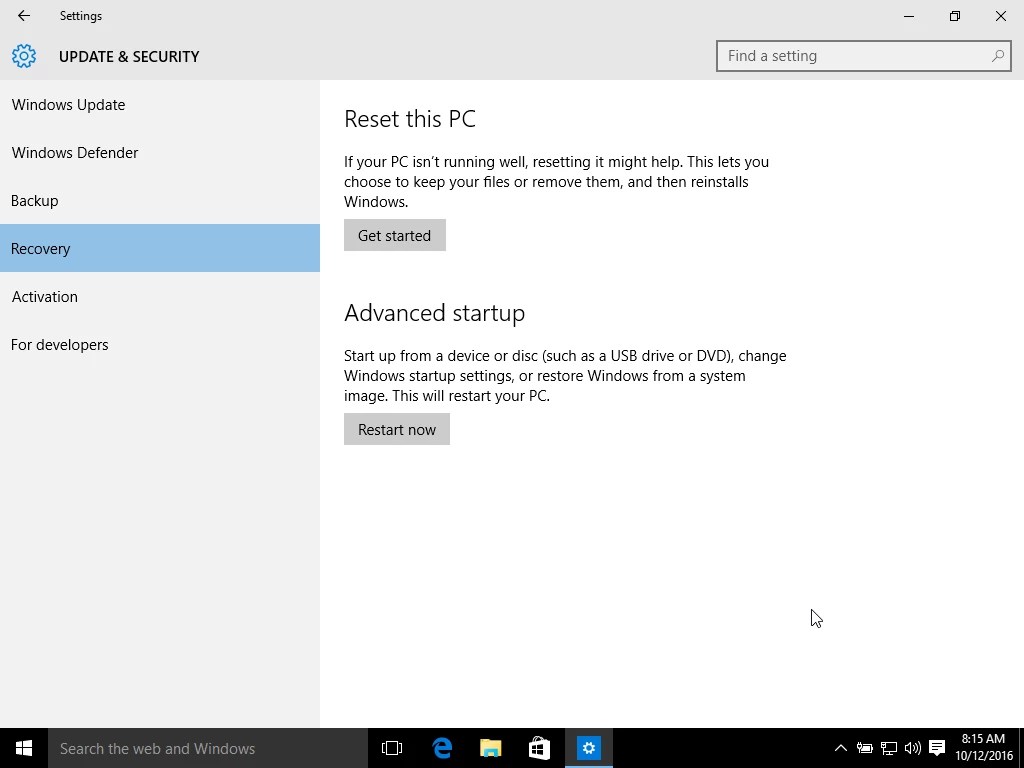
Follow these steps to run a Refresh on your Windows 10 system:
- Navigate to the Settings section.
- Go to Security and Updates.
- Select Recover.
- Click Get started now.
- Click Get started in the Reset This PC section.
- Click Keep My Documents
- To complete the refresh procedure, follow the instructions.

Reset
Follow these procedures to perform a Windows 10 system reset:
- Navigate to the Settings section.
- Go to Security and Updates.
- Select Recover.
- Click Get started now.
- Click the Reset This PC button under the Reset This PC section. Begin now.
- Remove everything by clicking Remove Everything.
- To complete the refresh procedure, follow the instructions.
Troubleshooting
Windows XP Registry Permissions
The registry permissions in Windows XP (only the Professional edition) can prevent you from modifying specific keys.
Method 1
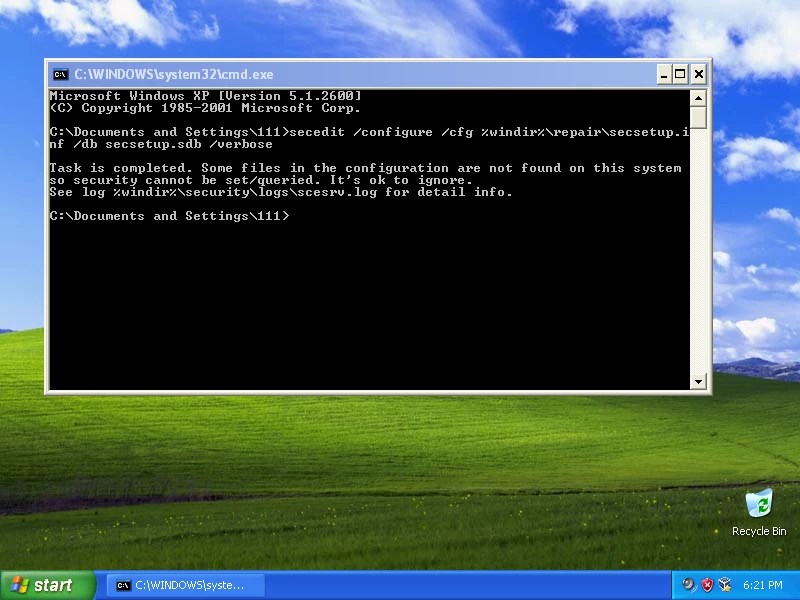
Follow these procedures to unblock it and fix the permissions:
- Start a Command Prompt
- Type this command:
secedit /configure /cfg %windir%\repair\secsetup.inf /db secsetup.sdb /verbose
3. Press the Enter key.
Method 2
If Method 1 fails to resolve the permissions, try the following steps instead:
- SubInACL Tool can be downloaded straight from Microsoft: http://www.microsoft.com/en-us/download/details.aspx?id=2351…
- Start the.exe file.
- Start a Command Prompt
- Press Enter after typing the following command:
cd "%ProgramFiles%\Windows Resource Kits\Tools
5. Tools for Windows Resource Kits
subinacl /subkeyreg HKEY_LOCAL_MACHINE /grant=administrators=f /grant=system=f
subinacl /subkeyreg HKEY_CURRENT_USER /grant=administrators=f /grant=system=f
subinacl /subkeyreg HKEY_CLASSES_ROOT /grant=administrators=f /grant=system=f
subinacl /subdirectories %SystemDrive%\ /grant=administrators=f /grant=system=f
6. Restart the computer.
Conclusion
I hope this information was helpful. If you have anything to add, please do so in the comments.
User Questions:
1. How do I clean and repair my registry?
In most cleaning tools, starting a registry dusting is a two-click operation. Take, for example, CCleaner. Simply go to the registry tab in the sidebar, select ‘Scan for Issues,’ and then ‘Fix Selected Issues.’ And that’s all there is to it.
2. Is it necessary to repair the registry?
If your registry is corrupted, you’re in for more trouble, and a registry cleanup won’t help – at the very least, you’ll need to run System Restore. Not utilizing a registry cleanup isn’t in any way “risky.” The registry entries that are naturally collected aren’t hazardous.
3. What is the meaning of a registry error?
Incorrectly removed software can leave registry entries that cause start-up issues, resulting in registry errors. A large number of useless files on your computer system might also cause registry issues by consuming system resources for no reason.
4. Registry scanner/fixer that actually works and isn’t scumware
Registry scanner/fixer that actually works and isn’t scumware from windows
5. Broken Registry Items on New PC


