Here we can see, “How to: Change Windows Defender’s Max Cpu Usage During Scans”
- You may quickly alter Windows Defender’s maximum CPU use if you believe the built-in antivirus consumes too many resources.
- Using a command-line tool from your operating system will give you the exact limit you require.
- You can also use the Registry Editor to correct resource consumption issues.
- Of course, if it appears to be too difficult, you should consider investing in a third-party antivirus program.
When it comes to a consumer’s cyber-protection, Windows Defender is Microsoft’s default and most reliable line of defence.
This is accomplished through the security intelligence definitions, which are updated regularly. In addition, the software performs admirably.
However, those of you running Windows 10 on older PCs may note that the maximum CPU consumption for scans in Windows Defender can be pretty high at times.
If that’s the case, learning how to reduce CPU utilization can save you time and money in the long term.
How do I alter the maximum CPU utilization of Windows Defender?
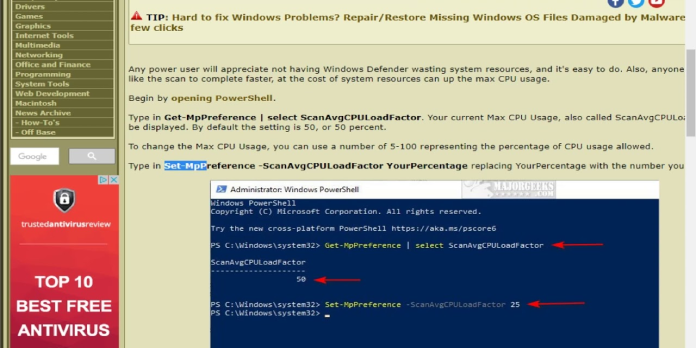
1. Using PowerShell, change Windows Defender’s maximum CPU utilization
- Select PowerShell (Admin) from the list by right-clicking the Start button.
- The following command should be typed in or copied and pasted:
Get-MpPreference | select ScanAvgCPULoadFactor
- The current CPU utilization percentage limit for Windows Defender will be displayed as a result of this action.
- Type or copy-paste the following command to alter the value:
Set-MpPreference -ScanAvgCPULoadFactor <percentage>
Keep in mind that the percentage value must be between 5 and 100. If you set the percentage value to 0, the CPU limit will be removed, allowing Windows Defender to use all of it.
This is not recommended because it might cause apps to become unresponsive, freeze, or even overheat, so proceed with caution.
2. Using the registry, change Windows Defender’s maximum CPU utilization
- Press the Windows + R keys at the same time.
- Press Enter after typing regedit (This will open the Registry Editor).
- Go to the following key in the Registry:
HKEY_LOCAL_MACHINE/SOFTWARE/Policies/Microsoft/Windows Defender/Scan
- AvgCPULoadFactor is a 32-bit DWORD value that you can edit or create.
- Toggle the Decimal value data editor on.
- Set the value data to a number between 5 and 100.
Simply delete the DWORD you made to reverse the modification, and everything will return to its prior state.
3. Using Group Policy, change the maximum CPU utilization of Windows Defender
- Press Win + R to return to the previous screen.
- To open the Group Policy Editor, type gpedit.msc and press Enter.
- Select Computer Configuration from the drop-down menu.
- Take the following route:
Administrative Templates/Windows Components/Microsoft Defender Antivirus/Scan
- Select the Specify the maximum percentage of CPU consumption during a scan policy option and double-click it.
- Allow it to work.
- Enter the desired CPU limit in the box below. Then, during a scan, specify the maximum percentage of CPU usage.
- Apply should be selected.
- Click the OK button.
You can control the average CPU consumption of Windows Defender during scans by following these instructions.
Changing the value offers both advantages and disadvantages. While larger values indicate that the scans will run faster, you won’t be able to use the computer until it is finished.
On the other hand, lower levels suggest that your scans will take a lengthy time, but you will be able to use your computer uninterrupted.
4. Get a better antivirus program
Unfortunately, many customers have reported that when Windows Defender performs a scan, it uses many CPU resources.
We just showed you how to modify it, but you can always switch to a third-party antivirus that won’t cause you any problems if you find it too difficult.
In reality, the tool listed below offers a low-power mode that turns off all resource-intensive tasks to save energy.
This is particularly ideal if you’re using it on a laptop and want to complete your tasks as quickly as possible.
That’s all there is to it! We hope that our instructions helped you modify the maximum CPU utilization of Windows Defender during scans.
Conclusion
I hope you found this guide useful. If you’ve got any questions or comments, don’t hesitate to use the shape below.
User Questions:
1. How can I get Windows Defender to use less CPU?
Antimalware Service Executable often causes considerable memory use while Windows Defender is doing a thorough scan for most individuals. We can fix this by scheduling the scans for a time when you’re less likely to notice the impact on your CPU.
2. How can I make Windows Defender’s complete scan go faster?
Clean away temporary (junk) files first, temporarily disable any other real-time protection systems, close all active programmes, run a Quick Scan instead of a Full Scan, and do not use the computer during the scan to speed up the process. You may also use file exclusions to speed up a scan.
3. How can I reduce the number of times Windows Defender scans?
Select the Triggers tab in the Windows Defender Scheduled Scan Properties (Local Computer) window, scroll to the bottom of the window, and then select New. Set how frequently you want scans to run and when you want them to begin.
4. I don’t want an antimalware which uses 56% of my cpu
I don’t want an antimalware which uses 56% of my cpu, anyway I can stop it? from IndianGaming
5. High CPU Usage During Win Defender Scan : r/sysadmin


