
This tutorial will show you how to make a Windows bootable USB stick for Windows XP, Windows Vista, Windows 7, Windows 8, Windows 8.1, and Windows 10.
You can install Windows directly from the USB drive if you create a bootable USB disc.
To install Windows from a USB drive, you’ll need one of the following:
- The Windows version’s ISO image or the Windows version’s original installation DVD
Prerequisites
Before you begin building a bootable USB flash drive to install Windows (XP, Vista, 7, 8, 8.1, or 10), ensure sure the following items are present:
- The USB disc is empty and formatted correctly.
- The USB drive can be used to start a computer.
- Your BIOS/UEFI is set up correctly to start with the USB flash drive.
- You have a Windows XP, Vista, 7, 8, or 8.1 ISO image. You can use the original Windows installation disc instead of the ISO image if you have one.
- Software for writing the ISO image to the USB drive or equivalents, such as NeoSmart’s Easy USB Creator 2.0 or Microsoft’s Windows 7 USB/DVD Download Tool.
USB Flash Drive
You’ll need at least 4 GB of free space on the USB disc you want to make bootable.
Configuration of the BIOS/UEFI
Follow our Boot from USB Drive instructions to ensure your BIOS/UEFI is set up to boot from a USB drive. You must make certain that:
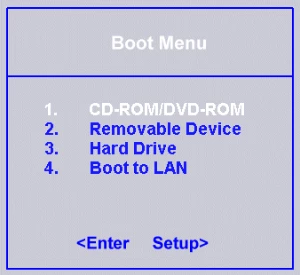
Check the BIOS/UEFI settings if a Boot Device option does not appear on your screen when the USB drive is plugged in. Depending on your computer type and Windows version, a Boot Device menu might seem like this:
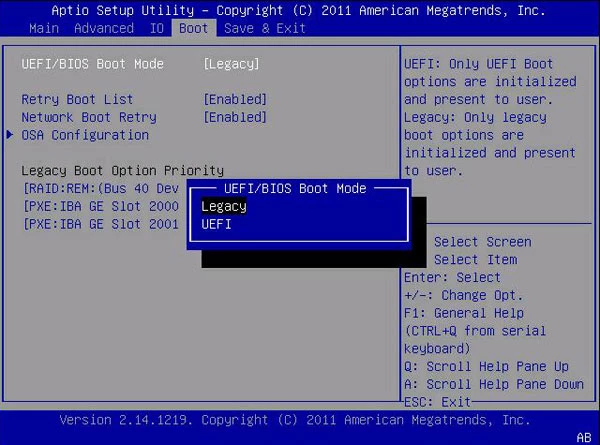
Make sure the Boot Legacy option is on if you’re using a new machine with UEFI/EFI:
If you’re using a machine with a Fast Boot option, make sure it’s turned off.
If your BIOS menu doesn’t have a USB item, it’s possible that you won’t be able to boot from a USB device. You can try booting into BIOS directly with the USB disc plugged in.
If the item does not display, you must install Windows or use the repair tools using the original Windows installation CD or DVD.
You may also utilize Easy Recovery Essentials and run Automated Repair to automatically discover and solve boot faults if you need to use the repair tools from an original Windows installation CD/DVD.
ISO image
If you don’t already have the ISO image for the bootable USB device, you can get one from Microsoft’s website.
The product (or license) key is required.
Make a bootable USB with Windows XP
These instructions will show you how to make a bootable USB drive using Windows XP.
Using Easy USB Creator 2.0
Easy USB Creator 2.0 can convert ISO images into bootable USB sticks in a matter of seconds:
Simply follow these steps to burn Windows XP to a USB device using Easy USB Creator 2.0:
- USB Creator 2.0 is available for download.
- Easy USB Creator 2.0 should be installed.
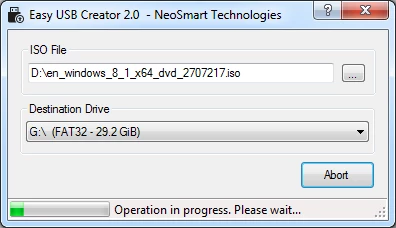
- To load the Windows XP ISO Image, go to the ISO File field and select it.
- In the Destination Drive section, choose the location of your USB Drive.
- Start
Both USB 2.0 and USB 3.0 are supported by Easy USB Creator 2.0.
It runs on Windows XP, Vista, Windows 7, Windows 8, Windows 8.1, and Windows 10, as well as Windows Server versions (2003, 2008, 2012). To use Easy USB Creator 2.0, you’ll need.NET Framework 2.0 or above.
If you have the installation DVD, go ahead and install it (CD)
You can use the original Microsoft Windows XP Professional installation CD to make a bootable USB using PE Builder if you have it.
Before you begin, make sure you have the following items:
- The archive for Windows Server 2003 SP1. If you don’t already have it, get it today from Microsoft: Service Pack 1 for Microsoft Windows Server 2003 (32 bit)
- PE Builder is a piece of software that allows you to create your own (BartPE). Download BartPE if you haven’t already.
- Not a Windows XP Home CD, but the original Windows XP Professional CD.
Follow these procedures to make a bootable disc with Windows XP:
- Start the computer.
- Install the PE Builder program to C:\ by downloading it from http://www.nu2.nu/pebuilder/ To make the next stages easier, the final route should be C:\PEBuilder.
Make a new folder called SRSP1 inside the PEBuilder folder. The path to this folder should be C:\PEBuilder\SRSP1.
- Download the Windows Server 2003 SP1 archive.
- Rename the MS-WS-SP1.exe archive you obtained from Microsoft.
- Open the Command Prompt window. You may also open it by typing cmd and pressing Enter in the Run dialogue box.
- To get to the location where the MS-WS-SP1.exe file is located, use the cd command:
cd c:\downloads
In the path above, do not type MS-WS-SP1.exe. You only need to navigate to the folder that contains the file.
- Replace the letter of the drive and the directory where the MS-WP-SP1.exe file is located with the letter of the drive and the directory where the MS-WP-SP1.exe file is located.
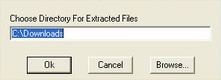
- To begin the extraction process, type MS-WS-SP1.exe -x and press Enter. Choose to extract the files to the same location, for example, c:\downloads :
You must now navigate to the extract folder under the i386 sub-folder in Command Prompt.
- If you’re still in the c:\downloads folder in Command Prompt and haven’t created a new folder for the extracted files, enter the following cd command:
cd i386
If you created a new folder in c: downloads for the extract files, say Extract, change the cd command to point to that folder:
cd c:\downloads\Extract
Then hit Enter after typing cd i386.
Command Prompt Type.
copy setupldr.bin c:\PEBuilder\SRSP1
If the PE Builder program path was modified in the previous stages, replace c:\PEBuilder with the new approach.
- Expand the ramdisk.sys file using the following command while still in Command Prompt:
expand -r ramdisk.sy_ c:\PEBuilder\SRSP1
Replace c:\PEBuilder\ with the path where the PE Builder software is installed, if this was changed in previous steps.
- Navigate to My Computer
- Navigate to the PEBuilder folder.
- Navigate to the SRSP1 folder.
- Make sure you have the following two files: ramdisk.sys and setupldr.bin
- In the disc tray, place the Windows XP Professional CD.
- PE Builder will be launched.
- Before you click, make the following adjustments. Build:
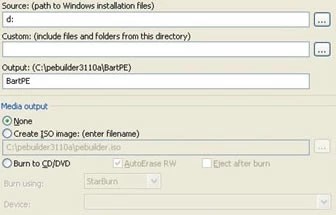
-
- Type the letter of the drive for the Windows XP CD in the Source area, for example, e:\
- Type BartPE in the Output field.
- Fill in the Custom field with nothing.
- The output of the media should be None
- To begin, click the Build button.
- When the build is finished, click Close.
- Go to Command Prompt and type the cd command to get to the PEBuilder folder:
cd c:\PEBuilder
- Enter the following command (while ensuring that the USB flash drive is not removed):
pe2usb -f d:
- Replace d: with the letter of the drive that contains your USB flash drive.
- When prompted, type YES to start the process. After typing YES, press Enter.
- After the pe2usb operation is complete, safely remove the USB flash drive from the port by pressing any key.
- Take the Windows XP CD out of the drive. try
- Check if the USB flash drive is now bootable with Windows XP Professional by rebooting the PC.
If your computer doesn’t automatically boot from the USB drive, go to Prerequisites > BIOS/UEFI configuration or read the Boot from USB drive tutorial to set your BIOS menu to boot from a USB device first.
Make a bootable USB drive for Windows Vista.
You can make a bootable USB using Easy USB Creator 2.0 or the diskpart tool, depending on whether you have the ISO image of Windows Vista or the actual DVD.
If you have the ISO image
Using Easy USB Creator 2.0
Easy USB Creator 2.0 can convert it into bootable USB sticks in a matter of seconds:
Easy USB Creator 2.0 is available for download.
Simply follow these steps to burn Windows Vista to a USB device using Easy USB Creator 2.0:
- USB Creator 2.0 is available for download.
- Easy USB Creator 2.0 should be installed.
- To load the Windows Vista ISO Image, go to the ISO File field and select it.
- In the Destination Drive section, choose the location of your USB Drive.
- Start
Both USB 2.0 and USB 3.0 are supported by Easy USB Creator 2.0.
It runs on Windows XP, Vista, Windows 7, Windows 8, Windows 8.1, and Windows 10, as well as Windows Server versions (2003, 2008, 2012). To use Easy USB Creator 2.0, you’ll need.NET Framework 2.0 or above.
Using the USB/DVD Download Tool in Windows 7
Follow the steps in Using the Windows 7 USB/DVD Download Tool from Windows 8/8.1 to generate the bootable disc with the Windows 7 USB/DVD Download Tool.
While the utility is called “Windows 7,” it can also be used on Windows Vista PCs.
If you have the installation disc (DVD)
Follow the procedures to generate a bootable USB with Windows Vista and install the operating system from that USB drive if you have the installation disc (DVD).
To make the USB device bootable, you’ll use the diskpart software, including Windows Vista. After the diskpart utility operation is completed, copy the installation disc (DVD) files to the USB drive.
The instructions are as follows:
- Startup your PC.
- Open Command Prompt as Administrator and run it. You may find Command Prompt by going to Start > All Programs Accessories > Command Prompt or typing cmd into the search box. To run Command Prompt as an administrator, right-click on the item and choose Run as Administrator.
- When the Command Prompt appears, type the following command and hit Enter:
cd c:\windows\system32
Replace c:\ with the letter of the driver where Windows Vista is installed, such as C:\, D:\, and so on.
4. Connect the USB flash drive to the computer’s USB port.
5. Type:
diskpart
6. Press.
7. Enter the following command: list disc
8. Press the Enter key.
9. Command Prompt will list the drives linked to your computer once you press Enter for the list disc command. Locate the USB drive and its associated number.
10. Then type the following command:
select disk X
Where X is the number displayed by Command Prompt for the USB flash drive.
The following should be included in the confirmation message:
Disk 1 is now the selected disk.
11. Press Enter
12. Type clean and press Enter
13. Type create partition primary and press Enter
14. Type select partition 1 and press Enter
15. Type active and press Enter
16. Type this command and press Enter afterwards:
format fs=ntfs
Depending on the size of the USB flash drive, formatting it may take a few minutes. However, you can format the drive more quickly by using the fast parameter:
format fs=ntfs quick
17. Type assign and then press Enter. Type exit and then press Enter.
18. In the optical drive, place the Windows Vista DVD.
19. Navigate to My Computer
20. Take note of the drive’s letter where the Windows Vista DVD is installed, such as D:, E:, and so on.
21. Return to Command Prompt and verify that the USB flash device was formatted.
22. When the formatting is finished, type the following command and click Enter:
d: cd boot
D: should be replaced with the letter of the drive that contains the Windows Vista DVD.
23. Then hit Enter after typing cd boot.
24. Press Enter after typing the following Command:
bootsect.exe /nt60 f:
Where f: is the drive letter on which your USB flash drive is installed.
25. On the USB flash device, copy all of the files from the Windows Vista DVD.
Right-click on the drive and select Open to view the contents of the DVD (rather than the Windows Vista DVD’s splash screen).
The USB flash drive should now be bootable with Windows Vista if you performed the previous instructions correctly.
You may test this by connecting the USB and restarting the computer. Go to BIOS/UEFI configuration to ensure that your machine boots from a USB device rather than the hard drive.
Make a bootable USB drive for Windows 7.
If you have Windows 7, you can make a bootable USB device if:
- You have either a Windows 7 ISO image or a genuine Windows 7 installation DVD.
If you have the ISO image, you can use it.
Easy USB Creator 2.0
Can convert ISO images into bootable USB sticks in a matter of seconds:
Simply follow these steps to burn Windows 7 to a USB drive using Easy USB Creator 2.0:
- USB Creator 2.0 is available for download.
- Easy USB Creator 2.0 should be installed.
- To load the Windows 7 ISO Image, go to the ISO File field and select it.
- In the Destination Drive section, choose the location of your USB Drive.
- Start
Both USB 2.0 and USB 3.0 are supported by Easy USB Creator 2.0.
It runs on Windows XP, Vista, Windows 7, Windows 8, Windows 8.1, and Windows 10, as well as Windows Server versions (2003, 2008, 2012). To use Easy USB Creator 2.0, you’ll need.NET Framework 2.0 or above.
Using the USB/DVD Download Tool in Windows 7
You can download the Windows 7 USB/DVD Download Tool and use it to make a bootable ISO image from the ISO image you purchased and downloaded from Microsoft.
Please double-check the following items before proceeding with these instructions:
- You’ve downloaded the Windows 7 USB/DVD Download Tool. If you haven’t already, get the Windows 7 USB/DVD Download Tool.
- You’ve prepared the Windows 7 ISO Image.
The instructions are as follows:
- Download and run the Windows 7 USB/DVD Download Tool from http://wudt.codeplex.com/.
- Click Browse in the Source File area to locate the Windows 7 ISO image on your computer and load it.
- Next, choose a USB device.
- From the drop-down option, choose a USB flash drive.
- Click Start copying.
- When the process is finished, exit the application.
If you don’t have the installation disc (DVD)
you can install Windows 7 from a USB flash drive (see Prerequisites for more information).
To do so, first, make the USB flash drive bootable, then copy the contents of the DVD to the USB drive using the original Windows 7 installation disc (DVD).
The diskpart utility, which is included with Windows 7, will be used.
If you have a Windows Vista installation disc, follow these steps (similar to Create a Windows Vista bootable USB > If you have an installation disc):
- Turn on the computer.
- As an administrator, open Command Prompt. Right-click on the command Prompt item in Start > All Programs Accessories > Run as Administrator.
- Enter the Administrator account’s password.
- Type the following in the Command Prompt:
cd c:\windows\system32
Replace c:\ with the letter of the driver where Windows 7 is installed, such as C:, D:, and so on.
5. Press the Enter key.
6. Place the USB device you want to make bootable in a convenient location.
7. Type diskpart and hit Enter, then type list disc and hit Enter. Command Prompt: list disc
8. In the list presented by Command Prompt, locate the USB drive and its corresponding number.
9. Press Enter after typing the following command:
select disk X
Where X is the number supplied by command Prompt above for the USB disc.
The following should be included in the confirmation message:
Disk 1 is now the selected disk.
10. Type clean, press Enter
11. Type create partition primary, press Enter
12. Type select partition 1, press Enter
13. Type active, press Enter
14. Type format fs=ntfs and press Enter.
To format the drive more rapidly, use the fast parameter: format fs=ntfs quick
- Go to My Computer after inserting the Windows 7 DVD. Take note of the drive’s letter where the DVD is loaded, such as D:\, E:\, and so on.
- Type assign and then press Enter. Type exit and then press Enter.
- When the formatting is finished, type the following Command in Command Prompt and click Enter:
d: cd boot
Where d: is the drive letter on which the Windows 7 DVD is installed.
- Press Enter after typing cd boot.
- Press Enter after typing the following Command:
bootsect.exe /nt60 f:
Where f: is the drive letter on which the USB flash device is installed.
- Open the Windows 7 DVD’s contents: Right-click the drive and select Open from the drop-down menu.
- Transfer all files from the DVD to the USB drive.
Create bootable USB for Windows 8 / 8.1.
If you have the ISO image of Windows Vista or the original DVD, you can generate a bootable USB with Easy USB Creator 2.0 if you have the ISO image or the diskpart program if you have the DVD.
If you have the ISO image
Using Easy USB Creator 2.0
Simply follow these steps to burn Windows 8 or 8.1 to a USB drive using Easy USB Creator 2.0:
- USB Creator 2.0 is available for download.
- Easy USB Creator 2.0 should be installed.
- In the ISO File area, select the Windows 8 or Windows 8.1 ISO Image to load.
- In the Destination Drive section, choose the location of your USB Drive.
- Start.
Both USB 2.0 and USB 3.0 are supported by Easy USB Creator 2.0.
It runs on Windows XP, Vista, Windows 7, Windows 8, Windows 8.1, and Windows 10, as well as Windows Server versions (2003, 2008, 2012). To use Easy USB Creator 2.0, you’ll need.NET Framework 2.0 or above.
Using the USB/DVD Download Tool in Windows 7
You can download the Windows 7 USB/DVD Download Tool and use it to make a bootable ISO image from the ISO image you purchased and downloaded from Microsoft.
Please double-check the following items before proceeding with these instructions:
- You’ve downloaded the Windows 7 USB/DVD Download Tool. If you haven’t already, get the Windows 7 USB/DVD Download Tool.
- You’ve prepared the ISO image for Windows 8 or 8.1.
The instructions are as follows:
- Start the Download Tool for Windows 7 USB/DVD.
- Click Browse in the Source File area to locate the Windows 8 or 8.1 ISO image on your machine.
- Next should be selected.
- Place the USB flash drive in an open computer port. Check to see if it’s installed in My Computer.
- To write the ISO image to the USB device, go to Step 2 and select USB Device. Instead, select DVD to burn the ISO image to a DVD.
- Step 3: From the drop-down option, choose the USB flash drive. You can refresh the drive by clicking the Refresh icon next to the drop-down option if it isn’t loaded yet.
- Click Start copying.
- Exit the Windows 7 USB/DVD Download Tool after you’re finished.
If you have the installation DVD, go ahead and install it (DVD)
You can make a bootable USB drive if you have the original installation disc (DVD) for Microsoft Windows 8 or Windows 8.1.
Follow the steps below to do so:
- Startup Windows 8 or 8.1.
- As an administrator, open Command Prompt. To do so, hit Windows and C at the same time to look for cmd. Right-click Command Prompt in the search results list.
- Click the Run as administrator button.
- When asked, enter the password.
- When the Command Prompt appears, type the following command and hit Enter:
diskpart
6. The USB flash drive should be inserted into the port.
7. Enter the command list disc.
8. In the list provided by the list disc command, find the number next to the USB drive.
9. Press Enter after typing choose disc X. Substitute the number of the USB drive specified in the previous steps for X.
10. The following should be included in the confirmation message:
Disk 1 is now the selected disk.
11. Type clean, press Enter
12. Type create partition primary, press Enter
13. Type select partition 1, press Enter
14. Type active, press Enter
15. Type format fs=ntfs, press Enter. To have the USB drive formatted more quickly, add the quick parameter: format fs=ntfs quick
16. Type assign, press Enter
17. Type exit, press Enter
18. Transfer the contents of the Windows 8 or 8.1 DVD to a USB flash device.
Make a bootable USB with Windows 10 on it.
If you have the ISO image, you can use it.
Easy USB Creator 2.0
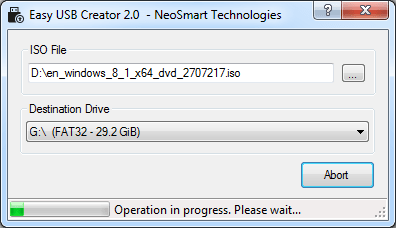
Simply follow these steps to burn Windows 10 to a USB drive using Easy USB Creator 2.0:
- USB Creator 2.0 is available for download.
- Easy USB Creator 2.0 should be installed.
- To load the Windows 10 ISO Image, go to the ISO File field and select it.
- In the Destination Drive section, choose the location of your USB Drive.
- Start.
Both USB 2.0 and USB 3.0 are supported by Easy USB Creator 2.0.
It runs on Windows XP, Vista, Windows 7, Windows 8, Windows 8.1, and Windows 10, as well as Windows Server versions (2003, 2008, 2012). To use Easy USB Creator 2.0, you’ll need.NET Framework 2.0 or above.
Using the USB/DVD Download Tool in Windows 7
You can download the Windows 7 USB/DVD Download Tool and use it to make a bootable ISO image from the ISO image you purchased and downloaded from Microsoft.
Please double-check the following items before proceeding with these instructions:
- You’ve downloaded the Windows 7 USB/DVD Download Tool. If you haven’t already, get the Windows 7 USB/DVD Download Tool.
- You’ve got the ISO image of Windows 10 ready to go.
The instructions are as follows:
- Start the Download Tool for Windows 7 USB/DVD.
- Click Browse and locate the Windows 10 ISO image on your PC in the Source File area.
- Next should be selected.
- Place the USB flash drive in an open computer port. Check to see if it’s installed in My Computer.
- To write the ISO image to the USB device, go to Step 2 and select USB Device. Instead, select DVD to burn the ISO image to a DVD.
- Step 3: From the drop-down option, choose the USB flash drive. You can refresh the drive by clicking the Refresh icon next to the drop-down option if it isn’t loaded yet.
- Click Start copying.
- Exit the Windows 7 USB/DVD Download Tool after you’re finished.
If you have the installation DVD, go ahead and install it (DVD)
You can construct a bootable USB drive if you have the original Microsoft Windows 10 installation disc (DVD).
Follow the steps below to do so:
- Startup Windows 10
- As an administrator, open Command Prompt. To do so, hit Windows and C at the same time to look for cmd. Right-click Command Promptcmd in the search results list.
- Click Run the program as an administrator.
- When asked, enter the password.
- When the Command Prompt appears, type the following command and hit Enter:
diskpart
6. The USB flash drive should be inserted into the port.
7. Enter the command list disc.
8. In the list provided by the list disc command, find the number next to the USB drive.
9. Press Enter after typing choose disc X. Substitute the number of the USB drive specified in the previous steps for X.
10. The following should be included in the confirmation message:
Disk 1 is now the selected disk.
11. Type clean, press Enter
12. Type create partition primary, press Enter
13. Type select partition 1, press Enter
14. Type active, press Enter
15. Type format fs=ntfs, press Enter. To have the USB drive formatted more quickly, add the quick parameter: format fs=ntfs quick
16. Type assign, press Enter
17. Type exit, press Enter
18. Copy the Windows 10 DVD’s contents to a USB flash drive.
Troubleshooting
Setup is unable to locate the End User Licensing Agreement (EULA)
When attempting to copy a Windows (XP, Vista, 7, 8, 8.1) ISO Image on a USB stick and make it bootable, you may receive the following error:
Setup cannot find the End User Licensing Agreement (EULA) Setup cannot continue.

To Quit, Press F3
If this is the case, the ISO image may be corrupted. In this instance, you might want to try:
Obtain a fresh ISO image from Microsoft
- Instead, construct a bootable drive using the original installation DVD (instructions for using the disc instead of the ISO image are available in this guide for all Windows versions)
- If you need to access repair tools, try Easy Recovery Essentials. To automatically scan and fix various boot errors, use EasyRE’s Automated Repair feature. Other options are available as well.
Windows 7 USB/DVD Download Tool can be downloaded here.
Visit http://wudt.codeplex.com/ to get the Windows 7 USB/DVD Download Tool.
The bootable USB does not work.
Check the following to ensure that the USB device will boot when your computer is turned on:
- Your BIOS settings allow USB drives to boot first, followed by hard drives. Follow the procedures in our BIOS/UEFI configuration guide or our guide to booting from a USB drive.
Because the bootable USB drive was made with the Windows 7 USB/DVD Download Tool, new PCs with UEFI may not boot from it because it was formatted with NTFS rather than FAT32.
To get around this, use the following steps:
- Go to My Computer and copy all items from the bootable USB drive to a folder on your Desktop after the Windows 7 USB/DVD Download Tool has successfully produced the bootable USB drive. Done
- Format the USB drive as FAT32 by right-clicking on it in My Computer.
- Copy all files from the folder you created on your Desktop back to the USB drive after the formatting process is finished.
Conclusion
I hope you found this information helpful. Please fill out the form below if you have any queries or comments.
User Questions:
1. Is it possible to make a Windows bootable USB drive?
Microsoft provides a specific tool for downloading the Windows 10 system image (also known as ISO) and creating a bootable USB stick.
2. How can I make my USB drive bootable from a USB drive?
- WINDOWS + E is the shortcut.
- Select “This PC” from the drop-down menu.
- Select your bootable USB by right-clicking it.
- Select “Format” from the drop-down menu.
- From the combo box on top, choose the size of your USB.
- Choose your table format (FAT32, NTSF)
- Select “Format” from the drop-down menu.
3. Is it possible to boot from a USB drive?
Connect the USB device to any accessible USB port on your computer. Making a bootable flash drive or setting up an external hard disc as a bootable drive is a difficult undertaking in and of itself. When trying to boot from a USB device, there is usually no key-press prompt. Normally, the USB boot process begins right away.
4. How to create a bootable Windows 10 Flash drive – Reddit
How to create a bootable Windows 10 Flash drive from technology
5. Best way to create bootable USB with ISO file?
Best way to create bootable USB with ISO file? and some newbie questions… from techsupport


